getCacheDir
getCacheDir()其对应着应用程序内的内部缓存,用来存储临时数据。因此在系统空间较少时有可能会被自动清除。存放路径一般是/data/data/<应用包名>/cache目录。

getExternalCacheDir
getExternalCacheDir()对应着应用程序内的外部缓存,同样是用来存储临时数据的。但是其由于脱离了应用管理,因此并不会在空间少时被自动清除。存放路径一般是/storage/sdcard/Android/data/<应用包名>/cache目录。

应用卸载
当用户卸载当前应用程序时,以上两个方法里的内容都会随着应用卸载所清除。若有想要一直保存的内容,可以调用getExternalStorageDirectory目录下(抑或其他sd卡下的目录)进行保存。

当然,如果想要保存文件数据(长时间保存),上面对应着getFilesDir()和getExternalFilesDir(),类比即可。

笔记
可以看到,当有External(外存)时,数据都是缓存在sd卡中的(若存在);否则则是内部缓存(可管理)。

版权声明:本文为博主原创文章,遵循 CC 4.0 BY-SA 版权协议,转载请附上原文出处链接和本声明。

原文链接:https://blog.csdn.net/CarsonWoo/article/details/89142756

ppConstants.java

public static  String AppPay = “AppPay”;

public static  String AppPay_AccountPay = “/AccountPay”;

public static  String AppPay_TencentPay = “/TencentPay”;

public static  String AppPay_AllinPay = “/AllinPay”;

public static  String AppPay_VCardPay = “/VCardPay”;

public static  String AppPay_GetPayHistory = “/GetPayHistoryByUserId”;

public static  String AppPay_OrderConfirm = “/OrderConfirm”;

大家在开发Android应用的时候,应该会有沿用java的习惯,用static定义一些全局的变量。可是Android对进程和内存管理不同于PC的核心——如果资源足够,Android不会杀掉任何进程,另一个意思就是进程随时可能会被杀掉。而Android会在资源够的时候,重启被杀掉的进程。也就是说静态变量的值,如果不做处理,是不可靠的,可以说内存中的一切都不可靠。

网上很多文章说用Application来保存一些全局变量,这个方法经过我尝试之后,发现还是会被清空。怎么办呢?

当我快绝望的时候,忽然想起一个方法onSaveInstanceState()!我们可以覆写Activity的onSaveInstanceState()方法,保存当前页面的一些数据,在进程被摧毁之后,重新回到页面的时候,在onCreate(Bundle savedInstanceState)中的savedInstanceState取到保存的数据。本以为这样就可以解决问题了,但是想想之后,发现不可能每个页面都去保存一大堆变量。

最后我想到java的反射机制,可以为成员变量赋值,因为当应用的进程被系统摧毁之后,再回到应用,Application会重启,执行onCreate()方法,所以我就在onCreate()里调用

public void initAppData(){

try {

Class> clazz = AppConstants.class;

//获取这个类所有的成员变量

Field[] fields = clazz.getDeclaredFields();

for(Field field : fields) {

Object appConstants;

//得到一个实例

appConstants = clazz.newInstance();

field.set(appConstants, field.get(field.getName()));

}

}catch (InstantiationException e) {

e.printStackTrace();

}catch (IllegalArgumentException e) {

e.printStackTrace();

} catch (IllegalAccessException e) {

e.printStackTrace();

}

}

Application重启之后,再进行数据的初始化。

link: https://blog.csdn.net/weixin_33443972/article/details/117617251
在 Java Native Interface (JNI) 中,SetSystemProperty 并不是一个直接可用的函数或方法。通常,你会通过 JNI 调用 Java 的系统属性相关方法来设置系统属性。

如何在 JNI 中设置系统属性

  1. 获取 java.lang.System 类:你需要首先获取 System 类的引用。
  2. 获取 setProperty 方法:然后获取这个类中 setProperty 方法的引用。
  3. 调用方法:通过 JNI 调用这个方法来设置属性。

示例代码

以下是一个简单的示例,展示了如何在 JNI 中设置一个系统属性:

#include <jni.h>
#include <stdio.h>

JNIEXPORT void JNICALL Java_YourClass_setProperty(JNIEnv *env, jobject obj) {
    jclass systemClass = (*env)->FindClass(env, "java/lang/System");
    if (systemClass == NULL) {
        return; // 处理错误
    }

    jmethodID setPropertyMethod = (*env)->GetStaticMethodID(env, systemClass, "setProperty", "(Ljava/lang/String;Ljava/lang/String;)Ljava/lang/String;");
    if (setPropertyMethod == NULL) {
        return; // 处理错误
    }

    jstring key = (*env)->NewStringUTF(env, "myProperty");
    jstring value = (*env)->NewStringUTF(env, "myValue");

    (*env)->CallStaticObjectMethod(env, systemClass, setPropertyMethod, key, value);

    // 清理局部引用
    (*env)->DeleteLocalRef(env, key);
    (*env)->DeleteLocalRef(env, value);
    (*env)->DeleteLocalRef(env, systemClass);
}

使用步骤

  1. 编译并生成共享库:确保你的 JNI 代码编译正确,并生成相应的共享库(如 .dll.so 文件)。
  2. 在 Java 中加载本地库:使用 System.loadLibrary("your_library_name") 来加载本地库。
  3. 调用 JNI 方法:从 Java 代码中调用 setProperty 方法。

注意事项

  • 设置的系统属性在 JVM 运行期间有效,但不会影响外部环境。
  • 确保在多线程环境下小心使用,以避免潜在的数据竞争问题。

方法一,更新jar包文件

最先想到的办法是用命令把jar包解压jar -xvf xxx.jar 修改完毕后重新打包 jar cf xxx.jar * ,本以为是大功告成,执行java -jar xxx.jar 报错

no main manifest attribute,in xxx.jar

经了解需要在MANIFEST.MF文件添加main方法的类。用maven打包的话这些都自动配置了。 对比两次生成MANIFEST.MF文件里边确实少了不少内容项,根据报错内容主要的main方法的类没有指定

Main-Class: org.springframework.boot.loader.JarLauncher
Start-Class: xxxApp

用jar重新打包的方法肯定是不行了,肯定还有需要注意的细节。又一想我只是要修改配置文件,替换掉jar包里的配置文件就可以了。查了下jar的文档。果然有更新方法:

jar uf xxx.jar BOOT-INF/classes/application-dev.yml

替换之,启动jar,顺顺利利的启动了。

方法二,jar重新打包

后来对于最先想到的方法又在网上查了下,也有对应的解决办法,但是会有两个问题要处理

  1. 阻止jar打包时重新生成清单列表,  -M 不配置配置清单,这样还可以使用maven生成的配置清单也就是MANIFEST.MF
jar -cfM xxx.jar *
  1. jar打包时不进行压缩 -0
jar -cfM0 xxx *

压缩的话会有错误,如下:(已被压缩,嵌套的jar文件无需被压缩)

Unable to open nested entry 'BOOT-INF/lib/cache-api-0.4.jar'.
It has been compressed and nested jar files must be stored without compression.

最终命令:jar -cfM0 xxx.jar *

Link: https://www.cnblogs.com/dayou123123/p/6845432.html

实例化对象在JVM中实际上包含如下指令:

  1. 分配内存空间
  2. 初始化对象
  3. 将instance指向刚才分配好的内存空间地址

上述步骤在单线程中是没问题的。JVM在指令重排序也不会影响到单线程的执行顺序,但是在多线程环境下就会因为重排序导致出现使用未被初始化完成的对象,指令会被重排序为:

  1. 分配内存空间
  2. 将instance指向刚分配好的内存空间地址
  3. 初始化对象

如果线程1执行到了上述的步骤2,线程2执行就会使用未被初始化完成的对象。

  • 带双重检查的延迟初始化
public class DoubleCheckedInstance {
    private volatile static Instance instance;
    public static Instance getInstance() {
        if (instance == null) {
            synchronized (DoubleCheckedInstance.class) {
                if (instance == null) {
                    instance = new Instance();
                }
            }
        }

        return instance;
    }
}

关键点:

private volatile static Instance instance;

如果没有volatile关键字,则在实例化Instance对象时会出现指令重排序,从而导致在多线程环境下使用了未被初始化完成的对象。

  • 基于类延迟初始化
public class InstanceFactory {
    private static class InstanceHolder {
        public static Instance instance = new Instance();
    }
    
    public static Instance getInstance() {
        return InstanceHolder.instance;
    }
}

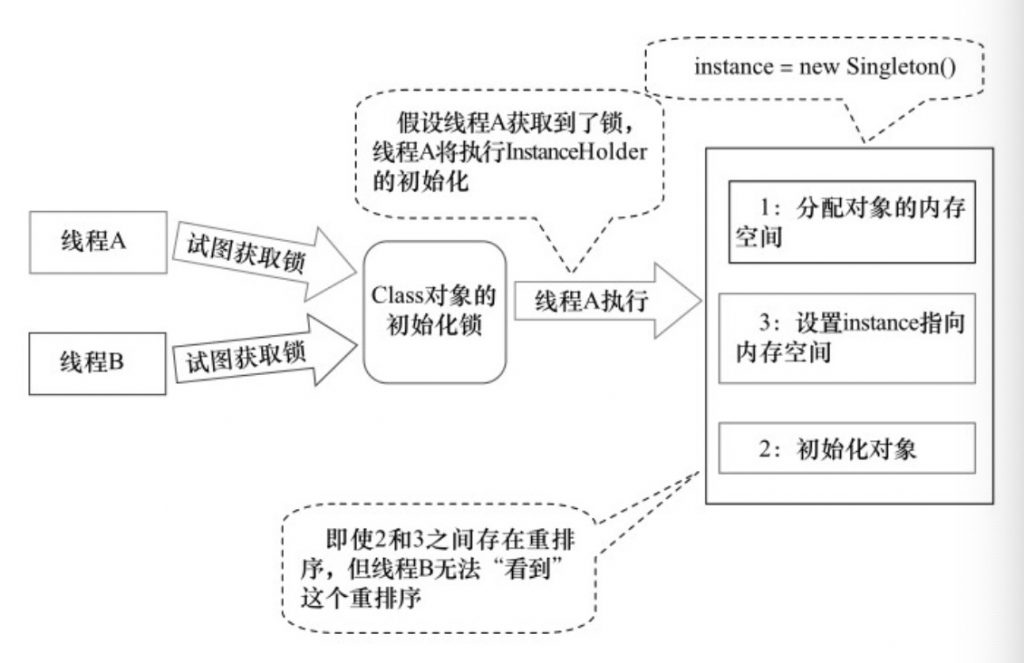
JVM在类的初始化阶段(即在Class被加载后,且被线程使用之前),会执行类的初始化。在执行类的初始化期间,JVM会去获取一个锁。这个锁可以同步多个线程对同一个类的初始化。

两个线程并发执行的示意图

参考资料:

  1. 方腾飞,魏鹏,程晓明.《Java并发编程的艺术》机械工业出版社 ISBN:9787111508243

如果代码中使用了线程池,一种优雅停机的方式就是注册一个JVM钩子函数,在JVM进程关闭之前,先将线程池关闭,及时释放资源。

public static NamesrvController start(final NamesrvController controller) throws Exception {

        if (null == controller) {
            throw new IllegalArgumentException("NamesrvController is null");
        }

        boolean initResult = controller.initialize();
        if (!initResult) {
            controller.shutdown();
            System.exit(-3);
        }

        Runtime.getRuntime().addShutdownHook(new ShutdownHookThread(log, new Callable<Void>() {
            @Override
            public Void call() throws Exception {
                controller.shutdown();
                return null;
            }
        }));

        controller.start();

        return controller;
    }

link: https://github.com/apache/rocketmq/blob/master/namesrv/src/main/java/org/apache/rocketmq/namesrv/NamesrvStartup.java

com.mysql.jdbc.Driver 是 mysql-connector-java 5中的, 即如果你的数据库是5.x及以下的使用该驱动
com.mysql.cj.jdbc.Driver 是 mysql-connector-java 6中的,即如果你的数据库是6.0及以上版本的,使用该驱动。

mysql5的驱动pom范例:

		<dependency>
			<groupId>mysql</groupId>
			<artifactId>mysql-connector-java</artifactId>
			<version>5.1.47</version>
			<scope>runtime</scope>
		</dependency>

mysql8的驱动pom范例:

		<dependency>
			<groupId>mysql</groupId>
			<artifactId>mysql-connector-java</artifactId>
			<version>8.0.16</version>
			<scope>runtime</scope>
		</dependency>

MySQL 5的application.properties 属性配置:

#mysql数据库连接配置
spring.datasource.url=jdbc:mysql://localhost:3306/test?useUnicode=true&characterEncoding=UTF8&useSSL=false
spring.datasource.username=user
spring.datasource.password=test
spring.datasource.driver-class-name=com.mysql.jdbc.Driver

MySQL 8的application.properties 属性配置:

#mysql数据库连接配置
spring.datasource.url=jdbc:mysql://localhost:3306/test?serverTimezone=Asia/Shanghai&useUnicode=true&characterEncoding=UTF8&useSSL=false
spring.datasource.username=user
spring.datasource.password=test
spring.datasource.driver-class-name=com.mysql.cj.jdbc.Driver

The following graph describes the main configurations setup when the Java Library plugin is in use.

  • The configurations in green are the ones a user should use to declare dependencies
  • The configurations in pink are the ones used when a component compiles, or runs against the library
  • The configurations in blue are internal to the component, for its own use
  • The configurations in white are configurations inherited from the Java plugin

And the next graph describes the test configurations setup:

The compiletestCompileruntime and testRuntime configurations inherited from the Java plugin are still available but are deprecated. You should avoid using them, as they are only kept for backwards compatibility.

The role of each configuration is described in the following tables:

Table 1. Java Library plugin – configurations used to declare dependencies

Configuration nameRoleConsumable?Resolvable?Description
apiDeclaring API dependenciesnonoThis is where you should declare dependencies which are transitively exported to consumers, for compile.
implementationDeclaring implementation dependenciesnonoThis is where you should declare dependencies which are purely internal and not meant to be exposed to consumers.
compileOnlyDeclaring compile only dependenciesyesyesThis is where you should declare dependencies which are only required at compile time, but should not leak into the runtime. This typically includes dependencies which are shaded when found at runtime.
runtimeOnlyDeclaring runtime dependenciesnonoThis is where you should declare dependencies which are only required at runtime, and not at compile time.
testImplementationTest dependenciesnonoThis is where you should declare dependencies which are used to compile tests.
testCompileOnlyDeclaring test compile only dependenciesyesyesThis is where you should declare dependencies which are only required at test compile time, but should not leak into the runtime. This typically includes dependencies which are shaded when found at runtime.
testRuntimeOnlyDeclaring test runtime dependenciesnonoThis is where you should declare dependencies which are only required at test runtime, and not at test compile time.

Table 2. Java Library plugin — configurations used by consumers

Configuration nameRoleConsumable?Resolvable?Description
apiElementsFor compiling against this libraryyesnoThis configuration is meant to be used by consumers, to retrieve all the elements necessary to compile against this library. Unlike the default configuration, this doesn’t leak implementation or runtime dependencies.
runtimeElementsFor executing this libraryyesnoThis configuration is meant to be used by consumers, to retrieve all the elements necessary to run against this library.

Table 3. Java Library plugin – configurations used by the library itself

Configuration nameRoleConsumable?Resolvable?Description
compileClasspathFor compiling this librarynoyesThis configuration contains the compile classpath of this library, and is therefore used when invoking the java compiler to compile it.
runtimeClasspathFor executing this librarynoyesThis configuration contains the runtime classpath of this library
testCompileClasspathFor compiling the tests of this librarynoyesThis configuration contains the test compile classpath of this library.
testRuntimeClasspathFor executing tests of this librarynoyesThis configuration contains the test runtime classpath of this library

Link: https://docs.gradle.org/current/userguide/java_library_plugin.html

The key difference between the standard Java plugin and the Java Library plugin is that the latter introduces the concept of an APIexposed to consumers. A library is a Java component meant to be consumed by other components. It’s a very common use case in multi-project builds, but also as soon as you have external dependencies.

The plugin exposes two configurations that can be used to declare dependencies: api and implementation. The apiconfiguration should be used to declare dependencies which are exported by the library API, whereas the implementationconfiguration should be used to declare dependencies which are internal to the component.

Example 2. Declaring API and implementation dependencies

dependencies {
    api("commons-httpclient:commons-httpclient:3.1")
    implementation("org.apache.commons:commons-lang3:3.5")
}

Dependencies appearing in the api configurations will be transitively exposed to consumers of the library, and as such will appear on the compile classpath of consumers. Dependencies found in the implementation configuration will, on the other hand, not be exposed to consumers, and therefore not leak into the consumers’ compile classpath. This comes with several benefits:

  • dependencies do not leak into the compile classpath of consumers anymore, so you will never accidentally depend on a transitive dependency
  • faster compilation thanks to reduced classpath size
  • less recompilations when implementation dependencies change: consumers would not need to be recompiled
  • cleaner publishing: when used in conjunction with the new maven-publish plugin, Java libraries produce POM files that distinguish exactly between what is required to compile against the library and what is required to use the library at runtime (in other words, don’t mix what is needed to compile the library itself and what is needed to compile against the library).

If your build consumes a published module with POM metadata, the Java and Java Library plugins both honor api and implementation separation through the scopes used in the pom. Meaning that the compile classpath only includes compilescoped dependencies, while the runtime classpath adds the runtime scoped dependencies as well.

This often does not have an effect on modules published with Maven, where the POM that defines the project is directly published as metadata. There, the compile scope includes both dependencies that were required to compile the project (i.e. implementation dependencies) and dependencies required to compile against the published library (i.e. API dependencies). For most published libraries, this means that all dependencies belong to the compile scope. However, as mentioned above, if the library is published with Gradle, the produced POM file only puts api dependencies into the compile scope and the remaining implementation dependencies into the runtime scope.

link: https://docs.gradle.org/current/userguide/java_library_plugin.html