文章目录

proxy_set_header官网说明

官网关于proxy_set_header的说明如下:

Syntax:   proxy_set_header field value;
Default:  proxy_set_header Host $proxy_host;
          proxy_set_header Connection close;
Context:  httpserverlocation

Allows redefining or appending fields to the request header passed to the proxied server. The value can contain text, variables, and their combinations. These directives are inherited from the previous level if and only if there are no proxy_set_header directives defined on the current level. By default, only two fields are redefined:

proxy_set_header Host       $proxy_host;
proxy_set_header Connection close;

If caching is enabled, the header fields “If-Modified-Since”, “If-Unmodified-Since”, “If-None-Match”, “If-Match”, “Range”, and “If-Range” from the original request are not passed to the proxied server.

An unchanged “Host” request header field can be passed like this:

proxy_set_header Host       $http_host;

However, if this field is not present in a client request header then nothing will be passed. In such a case it is better to use the $host variable – its value equals the server name in the “Host” request header field or the primary server name if this field is not present:

proxy_set_header Host       $host;

In addition, the server name can be passed together with the port of the proxied server:

proxy_set_header Host       $host:$proxy_port;

f the value of a header field is an empty string then this field will not be passed to a proxied server:

proxy_set_header Accept-Encoding "";
几个需要注意的地方:
  • $host、$proxy_host和$http_host区别
  • Http协议header头中的host对Nginx的影响

$host、$proxy_host和$http_host区别

为了更方便的说明这三者之间的区别,我们使用一个转发范例进行说明:

    upstream myapp1 {
        server app.example.com;
    }

    server {
        listen 80;
        server_name  proxy1.test.com;
        location / {
            proxy_pass http://myapp1;
            proxy_set_header Host $host;
        }
    }

    server {
        listen 80;
        server_name  proxy2.test.com;
        location / {
            proxy_pass http://myapp1;
            proxy_set_header Host $proxy_host;
        }
    }

   server {
        listen 80;
        server_name  proxy3.test.com;
        location / {
            proxy_pass http://myapp1;
            proxy_set_header Host $http_host;
        }
    }
  • $host 按照如下优先级获得
    • 请求行中的host
    • 请求头中的Host头部
    • 与一条请求匹配的server name
  • $proxy_host 默认值,即代理的和转发的host
  • $http_host 请求头中读取到的Host

范例1:

curl -X GET \
  http://proxy1.test.com/ \
  -H 'Accept: */*' \
  -H 'Accept-Encoding: gzip, deflate' \
  -H 'Cache-Control: no-cache' \
  -H 'Connection: keep-alive' \
  -H 'Host: proxy1.test.com' \
  -H 'Referer: http://proxy1.test.com/' \
  -H 'cache-control: no-cache'

此时$host的值为proxy1.test.com

范例2:

curl -X GET \
  http://proxy2.test.com/ \
  -H 'Accept: */*' \
  -H 'Accept-Encoding: gzip, deflate' \
  -H 'Cache-Control: no-cache' \
  -H 'Connection: keep-alive' \
  -H 'Host: proxy2.test.com' \
  -H 'Referer: http://proxy1.test.com/' \
  -H 'cache-control: no-cache'

此时$proxy_host的值为app.example.com

范例2:

curl -X GET \
  http://proxy3.test.com/ \
  -H 'Accept: */*' \
  -H 'Accept-Encoding: gzip, deflate' \
  -H 'Cache-Control: no-cache' \
  -H 'Connection: keep-alive' \
  -H 'Host: proxy3.test.com' \
  -H 'Referer: http://proxy1.test.com/' \
  -H 'cache-control: no-cache'

此时$http_host的值为proxy3.test.com

header头中的Host对Nginx代理的影响

Nginx在做代理服务时,通常会启用多个server,请求会根据server name,进入相应的server配置执行流程,而Host就是Nginx进入不同server执行流程的依据,因此,在多server name的配置中,Host的正确至关重要,也要求我们在构建Http请求时,一定规范的使用Host这个header头。
在日常开发使用中经常会使用nginx进行反向代理或转发,因此记录一下:

location 匹配规则

location [=|~|~*|^~] /uri/ { … }

模式含义
location = /uri= 表示精确匹配,只有完全匹配上才能生效
location ^~ /uri^~ 开头对URL路径进行前缀匹配,并且在正则之前
location ~ pattern开头表示区分大小写的正则匹配
location ~* pattern开头表示不区分大小写的正则匹配
location /uri不带任何修饰符,也表示前缀匹配,但是在正则匹配之后
location /通用匹配,任何未匹配到其它location的请求都会匹配到,相当于switch中的default

前缀匹配时,Nginx 不对 url 做编码,因此请求为 /static/20%/aa,可以被规则 ^~ /static/ /aa 匹配到(注意是空格)

多个 location 配置的情况下匹配顺序为(参考资料而来,还未实际验证,试试就知道了,不必拘泥,仅供参考):

  • 首先精确匹配 =
  • 其次前缀匹配 ^~
  • 其次是按文件中顺序的正则匹配
  • 然后匹配不带任何修饰的前缀匹配
  • 最后是交给 / 通用匹配
  • 当有匹配成功时候,停止匹配,按当前匹配规则处理请求

注意:前缀匹配,如果有包含关系时,按最大匹配原则进行匹配。比如在前缀匹配:location /dir01与 location /dir01/dir02,如有请求 http://localhost/dir01/dir02/file 将最终匹配到 location /dir01/dir02

例子,有如下匹配规则:

location = / {
   echo "规则A";
}
location = /login {
   echo "规则B";
}
location ^~ /static/ {
   echo "规则C";
}
location ^~ /static/files {
    echo "规则X";
}
location ~ \.(gif|jpg|png|js|css)$ {
   echo "规则D";
}
location ~* \.png$ {
   echo "规则E";
}
location /img {
    echo "规则Y";
}
location / {
   echo "规则F";
}

那么产生的效果如下:

  • 访问根目录 /,比如 http://localhost/ 将匹配 规则A
  • 访问 http://localhost/login 将匹配 规则Bhttp://localhost/register 则匹配 规则F
  • 访问 http://localhost/static/a.html 将匹配 规则C
  • 访问 http://localhost/static/files/a.exe 将匹配 规则X,虽然 规则C 也能匹配到,但因为最大匹配原则,最终选中了 规则X。你可以测试下,去掉规则 X ,则当前 URL 会匹配上 规则C
  • 访问 http://localhost/a.gifhttp://localhost/b.jpg 将匹配 规则D 和 规则 E ,但是 规则 D 顺序优先,规则 E 不起作用,而 http://localhost/static/c.png 则优先匹配到 规则 C
  • 访问 http://localhost/a.PNG 则匹配 规则 E ,而不会匹配 规则 D ,因为 规则 E 不区分大小写。
  • 访问 http://localhost/img/a.gif 会匹配上 规则D,虽然 规则Y 也可以匹配上,但是因为正则匹配优先,而忽略了 规则Y
  • 访问 http://localhost/img/a.tiff 会匹配上 规则Y

访问 http://localhost/category/id/1111 则最终匹配到规则 F ,因为以上规则都不匹配,这个时候应该是 Nginx 转发请求给后端应用服务器,比如 FastCGI(php),tomcat(jsp),Nginx 作为反向代理服务器存在。

Link: https://moonbingbing.gitbooks.io/openresty-best-practices/ngx/nginx_local_pcre.html

文章目录

OpenResty基Nginx,把Web服务的整个生命周期和请求处理流程分为如下几个阶段:

处理阶段

Web服务的生命周期分为三个阶段:

  • initing : 服务启动,通常是读取配置文件,初始化内部数据结构;
  • running : 服务运行,接收客户端的请求,返回响应结果;
  • exiting : 服务停止,做一些必要的清理工作。

OpenResty关注的是initing和running两个阶段,并做了更细致的划分。

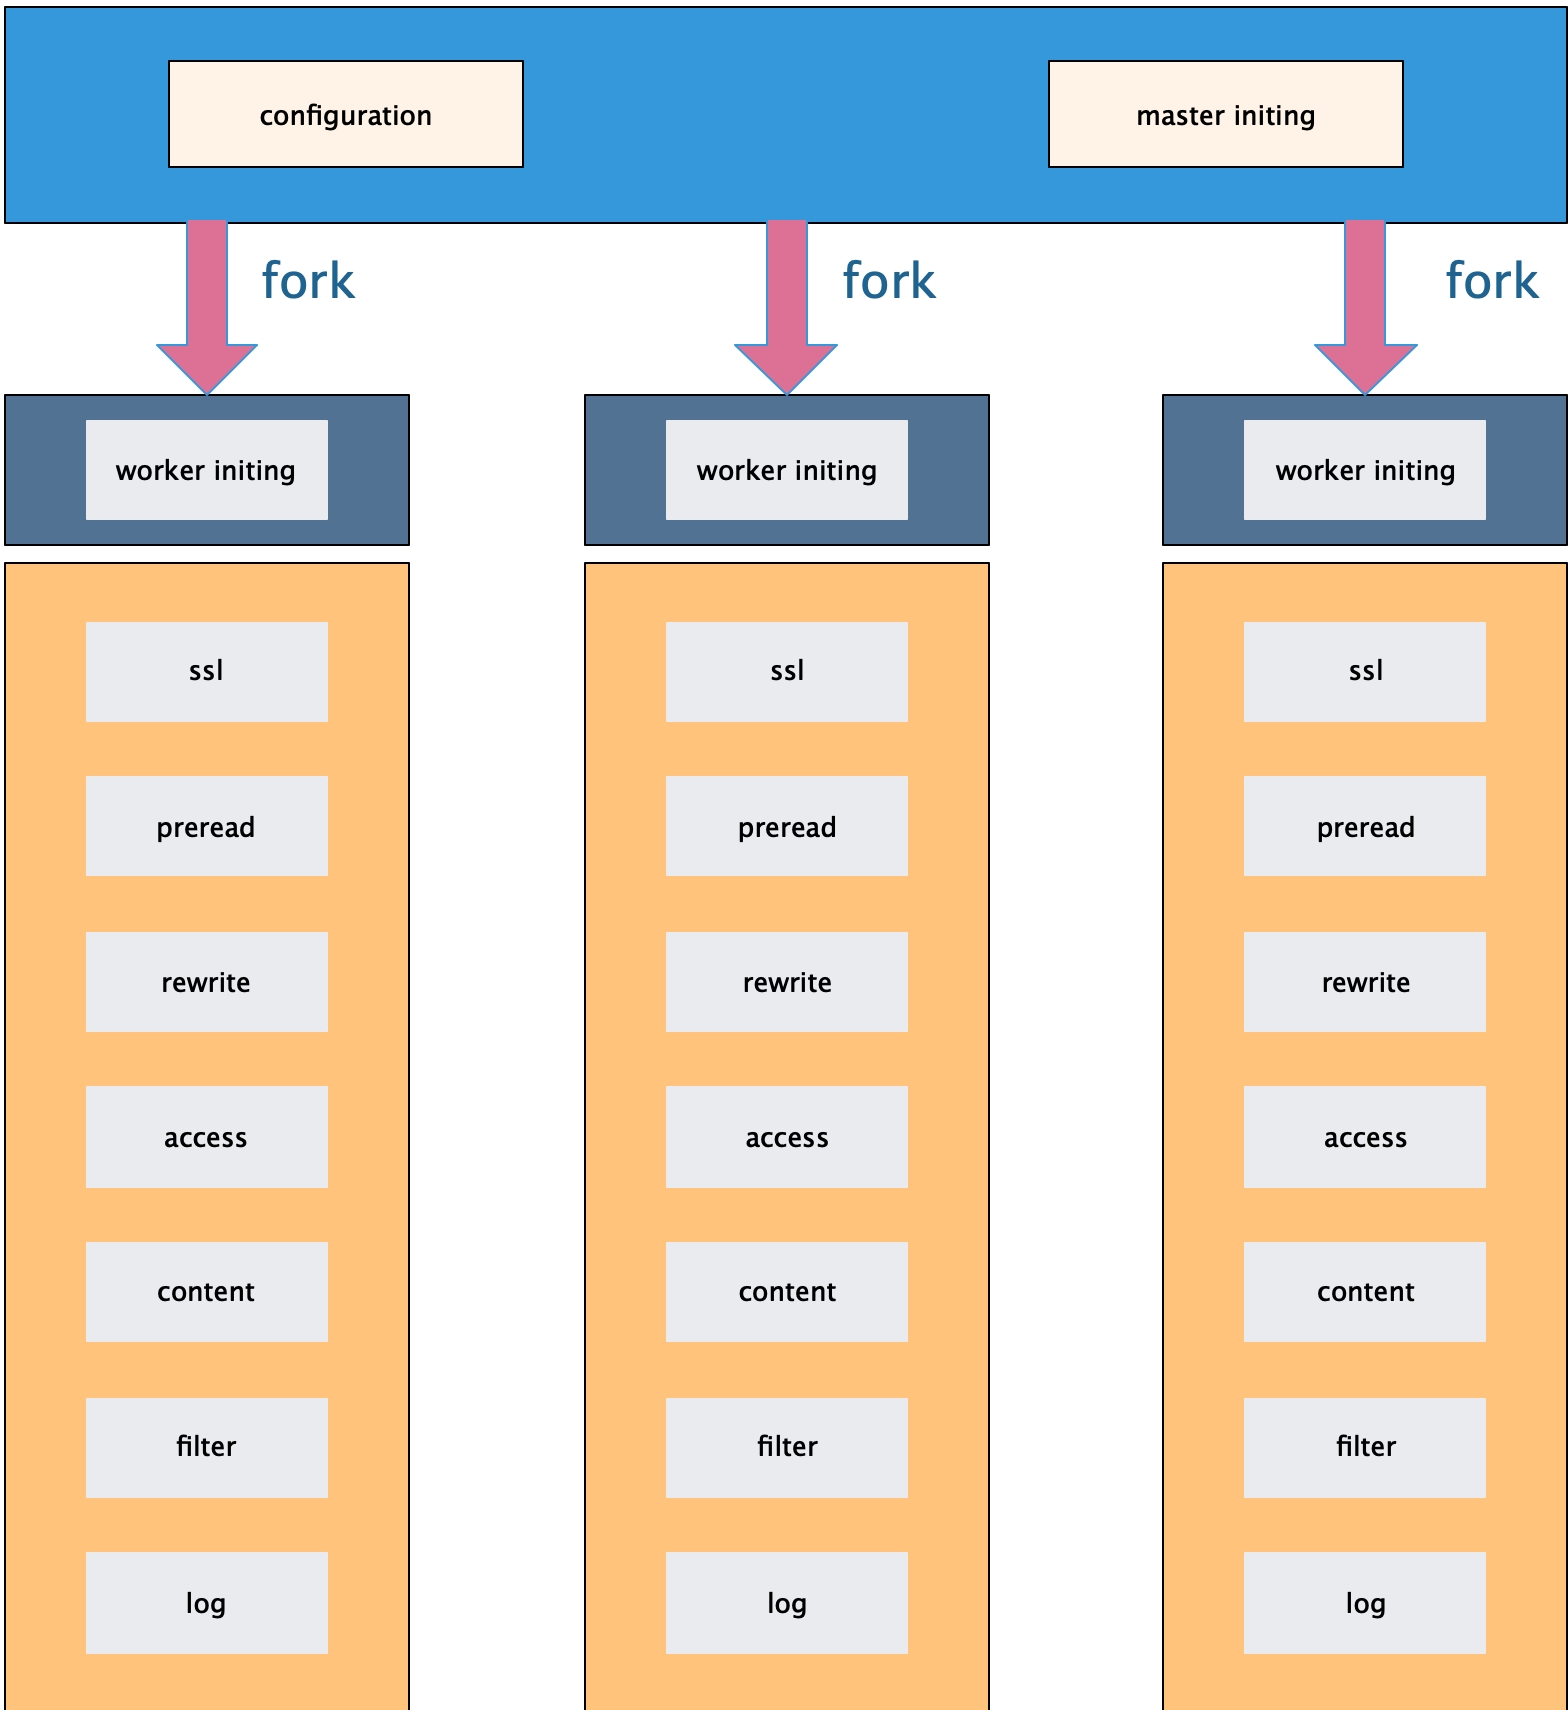
initing阶段在OpenResty里分为三个子阶段:

  • configuration : 读取配置文件,解析配置指令,设置运行参数;
  • master-initing : 配置文件解析完毕,master进程初始化公用数据;
  • worker-initing : worker进程的初始化。

在running阶段,OpenResty会按照如下流程来处理:

  • ssl : SSL / TLS 安全通信和验证
  • preread : 在正式处理之前“预读”数据,接收 HTTP 请求头
  • rewrite : 检查、改写 URI,实现跳转/重定向
  • access : 访问权限控制:
  • content : 产生响应内容
  • filter : 对 content 阶段产生的内容进行过滤加工处理
  • log : 请求处理完毕,记录日志,或者其他的收尾工作

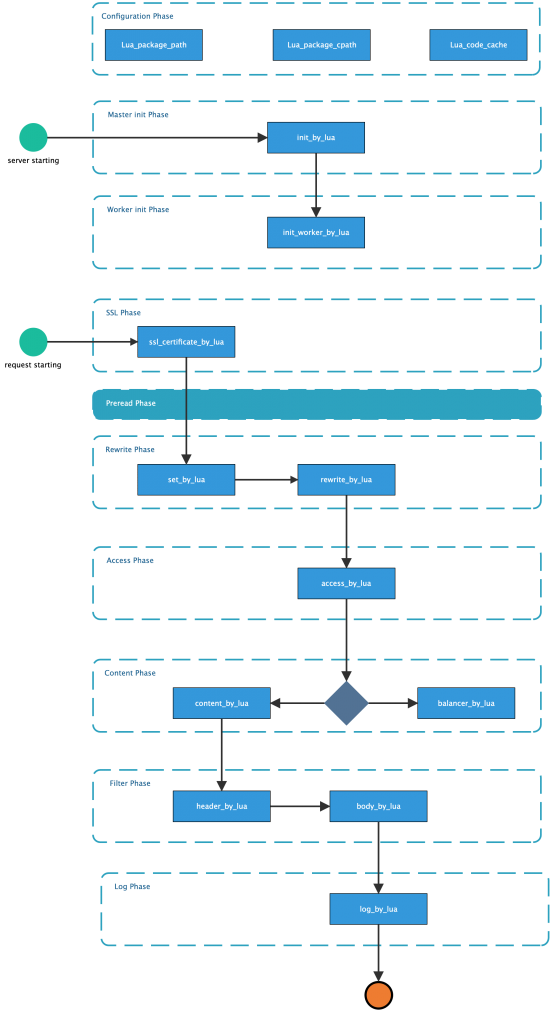
关系图如下:

OpenResty处理阶段

执行程序

对应于上述处理阶段,OpenResty提供了一系列的”xxx_by_lua”的指令:

  • init_by_lua : master-initing阶段,初始化全局配置或模块
  • init_work_by_lua : worker-initing阶段, 初始化进程专用功能
  • ssl_session_fetch_by_lua : ssl阶段,读取session
  • ssl_certificate_by_lua : ssl阶段,在“握手”时设置安全证书
  • ssl_session_store_by_lua : ssl阶段,存储session
  • set_by_lua : rewrite阶段,改写Nginx变量
  • rewrite_by_lua : rewrite阶段,改写URI,实现跳转或重定向
  • access_by_lua : access阶段,访问控制或限速
  • content_by_lua : content阶段,产生响应内容
  • balancer_by_lua : content阶段,反向代理时选择后端服务器
  • header_filter_by_lua : filter阶段,加工处理响应头
  • body_filter_by_lua : filter阶段,加工处理响应体
  • log_by_lua : log阶段,记录日志或其他收尾工作

流程图

参考文献:

  • 罗剑锋 《OpenResty完全开发指南-构建百万级别并发的Web应用》 电子工业出版社 ISBN 978-7-121-34896-9

com.mysql.jdbc.Driver 是 mysql-connector-java 5中的, 即如果你的数据库是5.x及以下的使用该驱动
com.mysql.cj.jdbc.Driver 是 mysql-connector-java 6中的,即如果你的数据库是6.0及以上版本的,使用该驱动。

mysql5的驱动pom范例:

		<dependency>
			<groupId>mysql</groupId>
			<artifactId>mysql-connector-java</artifactId>
			<version>5.1.47</version>
			<scope>runtime</scope>
		</dependency>

mysql8的驱动pom范例:

		<dependency>
			<groupId>mysql</groupId>
			<artifactId>mysql-connector-java</artifactId>
			<version>8.0.16</version>
			<scope>runtime</scope>
		</dependency>

MySQL 5的application.properties 属性配置:

#mysql数据库连接配置
spring.datasource.url=jdbc:mysql://localhost:3306/test?useUnicode=true&characterEncoding=UTF8&useSSL=false
spring.datasource.username=user
spring.datasource.password=test
spring.datasource.driver-class-name=com.mysql.jdbc.Driver

MySQL 8的application.properties 属性配置:

#mysql数据库连接配置
spring.datasource.url=jdbc:mysql://localhost:3306/test?serverTimezone=Asia/Shanghai&useUnicode=true&characterEncoding=UTF8&useSSL=false
spring.datasource.username=user
spring.datasource.password=test
spring.datasource.driver-class-name=com.mysql.cj.jdbc.Driver

在使用纯代码构建UI界面时,如果只是把NSViewController的View简单的Add到NSWindow中,则导致无法监听到action的。例如如下代码:

// mainwindow
let result = MainWindow(contentRect: AppConfig.windowRect, styleMask: .titled, backing: .buffered, defer: false)
result.styleMask.insert(.closable)
result.styleMask.insert(.miniaturizable)
result.title = NSLocalizedString("HomeTitle", comment: "")
result.titleVisibility = .visible
result.titlebarAppearsTransparent = false
result.delegate = result
result.center()
        
let viewController = MainViewController()
result.contentView?.addSubview(viewController.view)


// MainViewController 
... ...

slPasswordLength.target = self
slPasswordLength.action = #selector(onChangedPasswordLength(sender:))

... ...

@objc private func onChangedPasswordLength(sender: NSSlider) {
        tfPasswordLengthValue.stringValue = "\(sender.integerValue)"
        scStepper.intValue = sender.intValue
    }

错误的原因是在result.contentView?.addSubview(viewController.view)这一句,仅仅将view添加进去,正确的做法应该是将整个ViewController设置为MainWindow的contentViewController,如下:

let result = MainWindow(contentRect: AppConfig.windowRect, styleMask: .titled, backing: .buffered, defer: false)
result.styleMask.insert(.closable)
result.styleMask.insert(.miniaturizable)
result.title = NSLocalizedString("HomeTitle", comment: "")
result.titleVisibility = .visible
result.titlebarAppearsTransparent = false
result.delegate = result
result.center()
        
let viewController = MainViewController()
result.contentViewController = viewController

文章目录

在开发Mac OS App的时候如果想使用自定义的字体,并且在发布的时候也带上自定义的字体库,则需要如下几个步骤:

  • 添加字体文件到Xcode的项目中
  • 修改Info.plist

1. 添加字体文件

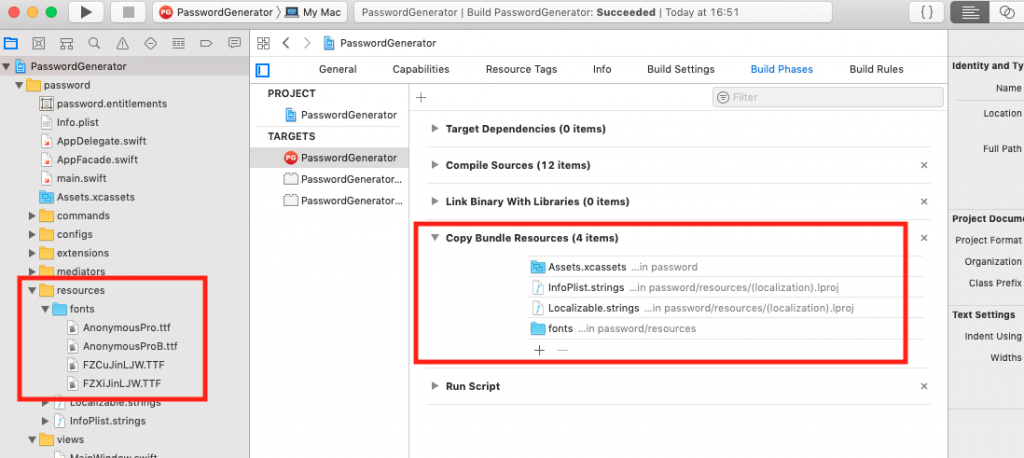
将字体文件拖拽(添加)到项目的资源库中。范例如下图:

2. 修改Info.plist文件

新增Fonts provided by application及Application fonts resource path两项。

  • Fonts provided by application选Array类型,每个item后填上一个字体文件的路径,新增了多少个字体文件,就填写多少个item
  • Application fonts resource path选String类型,填上字体文件所在目录路径即可。

注意:Application fonts resource path是Mac OS App项目必填的,否则找不到字体文件,这点是与iOS项目不一样的,iOS项目只需要填写Fonts provided by application即可。范例如下图:

完成上述两个步骤,即可使用自定义字体了。

extension NSFont {
    class func mainBoldFont(size: CGFloat) -> NSFont {
        let font = NSFont(name: "FZCUJINLJW--GB1-0", size: size)
        return font ?? NSFont.systemFont(ofSize: size)
    }
    
    class func mainFont(size: CGFloat) -> NSFont {
        let font = NSFont(name: "FZXIJINLJW--GB1-0", size: size)
        return font ?? NSFont.systemFont(ofSize: size)
    }
}

Mac OS App的storyboard中无法直接使用自定义的字体,但是可以在代码中使用,这个问题我没找到原因,如果您找到了方法请告知我。谢谢!

PS: 查看所有可用字体代码片段

let manager = NSFontManager.shared
for name: String in manager.availableFonts {
    print("font name=====" + name)
}

在使用Gradle打包成一个可运行的Jar包的时候,需要把编译时依赖的库也打包进去,因此要搞清楚打包时如何才能将库文件打包进去。

对于implementation引入的库,则需要如下的语句:

from {
        configurations.runtimeClasspath.collect { it.isDirectory() ? it : zipTree(it) }
    }

对于testImplementation引入的库,则需要如下的语句:

from {
        configurations.testRuntimeClasspath.collect { it.isDirectory() ? it : zipTree(it) }
    }

我们只需要打包运行时的依赖包即可,则完整build.gradle如下:

plugins {
    id 'java'
    id 'org.jetbrains.kotlin.jvm' version '1.3.21'
}

group 'com.zhuyanbin'
version '1.0.0'

sourceCompatibility = 1.8

repositories {
    mavenCentral()
}

jar {
    manifest {
        attributes 'Implementation-Title' : 'DropBox-Backup-Service'
        attributes 'Manifest-Version': '1.0.0'
        attributes 'Main-Class': 'com.zhuyanbin.dropbox.AppKt'
    }

    from {
        configurations.runtimeClasspath.collect { it.isDirectory() ? it : zipTree(it) }
    }
}

dependencies {

    implementation "org.jetbrains.kotlin:kotlin-stdlib-jdk8"
    implementation 'com.dropbox.core:dropbox-core-sdk:3.0.10'
    implementation 'commons-configuration:commons-configuration:1.9'
    testImplementation group: 'org.junit.platform', name: 'junit-platform-launcher', version:'1.4.0'
    testImplementation group: 'org.junit.jupiter', name: 'junit-jupiter-engine', version:'5.4.0'
    testImplementation group: 'org.junit.vintage', name: 'junit-vintage-engine', version:'5.4.0'
}

compileKotlin {
    kotlinOptions.jvmTarget = "1.8"
}
compileTestKotlin {
    kotlinOptions.jvmTarget = "1.8"
}

The following graph describes the main configurations setup when the Java Library plugin is in use.

  • The configurations in green are the ones a user should use to declare dependencies
  • The configurations in pink are the ones used when a component compiles, or runs against the library
  • The configurations in blue are internal to the component, for its own use
  • The configurations in white are configurations inherited from the Java plugin

And the next graph describes the test configurations setup:

The compiletestCompileruntime and testRuntime configurations inherited from the Java plugin are still available but are deprecated. You should avoid using them, as they are only kept for backwards compatibility.

The role of each configuration is described in the following tables:

Table 1. Java Library plugin – configurations used to declare dependencies

Configuration nameRoleConsumable?Resolvable?Description
apiDeclaring API dependenciesnonoThis is where you should declare dependencies which are transitively exported to consumers, for compile.
implementationDeclaring implementation dependenciesnonoThis is where you should declare dependencies which are purely internal and not meant to be exposed to consumers.
compileOnlyDeclaring compile only dependenciesyesyesThis is where you should declare dependencies which are only required at compile time, but should not leak into the runtime. This typically includes dependencies which are shaded when found at runtime.
runtimeOnlyDeclaring runtime dependenciesnonoThis is where you should declare dependencies which are only required at runtime, and not at compile time.
testImplementationTest dependenciesnonoThis is where you should declare dependencies which are used to compile tests.
testCompileOnlyDeclaring test compile only dependenciesyesyesThis is where you should declare dependencies which are only required at test compile time, but should not leak into the runtime. This typically includes dependencies which are shaded when found at runtime.
testRuntimeOnlyDeclaring test runtime dependenciesnonoThis is where you should declare dependencies which are only required at test runtime, and not at test compile time.

Table 2. Java Library plugin — configurations used by consumers

Configuration nameRoleConsumable?Resolvable?Description
apiElementsFor compiling against this libraryyesnoThis configuration is meant to be used by consumers, to retrieve all the elements necessary to compile against this library. Unlike the default configuration, this doesn’t leak implementation or runtime dependencies.
runtimeElementsFor executing this libraryyesnoThis configuration is meant to be used by consumers, to retrieve all the elements necessary to run against this library.

Table 3. Java Library plugin – configurations used by the library itself

Configuration nameRoleConsumable?Resolvable?Description
compileClasspathFor compiling this librarynoyesThis configuration contains the compile classpath of this library, and is therefore used when invoking the java compiler to compile it.
runtimeClasspathFor executing this librarynoyesThis configuration contains the runtime classpath of this library
testCompileClasspathFor compiling the tests of this librarynoyesThis configuration contains the test compile classpath of this library.
testRuntimeClasspathFor executing tests of this librarynoyesThis configuration contains the test runtime classpath of this library

Link: https://docs.gradle.org/current/userguide/java_library_plugin.html

The key difference between the standard Java plugin and the Java Library plugin is that the latter introduces the concept of an APIexposed to consumers. A library is a Java component meant to be consumed by other components. It’s a very common use case in multi-project builds, but also as soon as you have external dependencies.

The plugin exposes two configurations that can be used to declare dependencies: api and implementation. The apiconfiguration should be used to declare dependencies which are exported by the library API, whereas the implementationconfiguration should be used to declare dependencies which are internal to the component.

Example 2. Declaring API and implementation dependencies

dependencies {
    api("commons-httpclient:commons-httpclient:3.1")
    implementation("org.apache.commons:commons-lang3:3.5")
}

Dependencies appearing in the api configurations will be transitively exposed to consumers of the library, and as such will appear on the compile classpath of consumers. Dependencies found in the implementation configuration will, on the other hand, not be exposed to consumers, and therefore not leak into the consumers’ compile classpath. This comes with several benefits:

  • dependencies do not leak into the compile classpath of consumers anymore, so you will never accidentally depend on a transitive dependency
  • faster compilation thanks to reduced classpath size
  • less recompilations when implementation dependencies change: consumers would not need to be recompiled
  • cleaner publishing: when used in conjunction with the new maven-publish plugin, Java libraries produce POM files that distinguish exactly between what is required to compile against the library and what is required to use the library at runtime (in other words, don’t mix what is needed to compile the library itself and what is needed to compile against the library).

If your build consumes a published module with POM metadata, the Java and Java Library plugins both honor api and implementation separation through the scopes used in the pom. Meaning that the compile classpath only includes compilescoped dependencies, while the runtime classpath adds the runtime scoped dependencies as well.

This often does not have an effect on modules published with Maven, where the POM that defines the project is directly published as metadata. There, the compile scope includes both dependencies that were required to compile the project (i.e. implementation dependencies) and dependencies required to compile against the published library (i.e. API dependencies). For most published libraries, this means that all dependencies belong to the compile scope. However, as mentioned above, if the library is published with Gradle, the produced POM file only puts api dependencies into the compile scope and the remaining implementation dependencies into the runtime scope.

link: https://docs.gradle.org/current/userguide/java_library_plugin.html

使用Docker编译Kotlin时,遇到了如下报错:

FAILURE: Build failed with an exception.

* What went wrong:
Could not create service of type ScriptPluginFactory using BuildScopeServices.createScriptPluginFactory().
> Could not create service of type CrossBuildFileHashCache using BuildSessionScopeServices.createCrossBuildFileHashCache().

* Try:
Run with --stacktrace option to get the stack trace. Run with --info or --debug option to get more log output. Run with --scan to get full insights.

* Get more help at https://help.gradle.org

BUILD FAILED in 2s

我的Dockerfile如下:

FROM gradle:5.2.1-jdk8 as builder
COPY ./ /data/dropbox/
WORKDIR /data/dropbox
RUN gradle build --no-daemon

经过排查,发现是权限问题,无法启动gradle进行编译,因此加入如下一句:

USER root

即可成功通过。完整Dockerfile如下:

FROM gradle:5.2.1-jdk8 as builder
COPY ./ /data/dropbox/
USER root
WORKDIR /data/dropbox
RUN gradle build --no-daemon