在使用纯代码构建UI界面时,如果只是把NSViewController的View简单的Add到NSWindow中,则导致无法监听到action的。例如如下代码:

// mainwindow
let result = MainWindow(contentRect: AppConfig.windowRect, styleMask: .titled, backing: .buffered, defer: false)
result.styleMask.insert(.closable)
result.styleMask.insert(.miniaturizable)
result.title = NSLocalizedString("HomeTitle", comment: "")
result.titleVisibility = .visible
result.titlebarAppearsTransparent = false
result.delegate = result
result.center()
        
let viewController = MainViewController()
result.contentView?.addSubview(viewController.view)


// MainViewController 
... ...

slPasswordLength.target = self
slPasswordLength.action = #selector(onChangedPasswordLength(sender:))

... ...

@objc private func onChangedPasswordLength(sender: NSSlider) {
        tfPasswordLengthValue.stringValue = "\(sender.integerValue)"
        scStepper.intValue = sender.intValue
    }

错误的原因是在result.contentView?.addSubview(viewController.view)这一句,仅仅将view添加进去,正确的做法应该是将整个ViewController设置为MainWindow的contentViewController,如下:

let result = MainWindow(contentRect: AppConfig.windowRect, styleMask: .titled, backing: .buffered, defer: false)
result.styleMask.insert(.closable)
result.styleMask.insert(.miniaturizable)
result.title = NSLocalizedString("HomeTitle", comment: "")
result.titleVisibility = .visible
result.titlebarAppearsTransparent = false
result.delegate = result
result.center()
        
let viewController = MainViewController()
result.contentViewController = viewController

在开发Mac OS App的时候如果想使用自定义的字体,并且在发布的时候也带上自定义的字体库,则需要如下几个步骤:

  • 添加字体文件到Xcode的项目中
  • 修改Info.plist

1. 添加字体文件

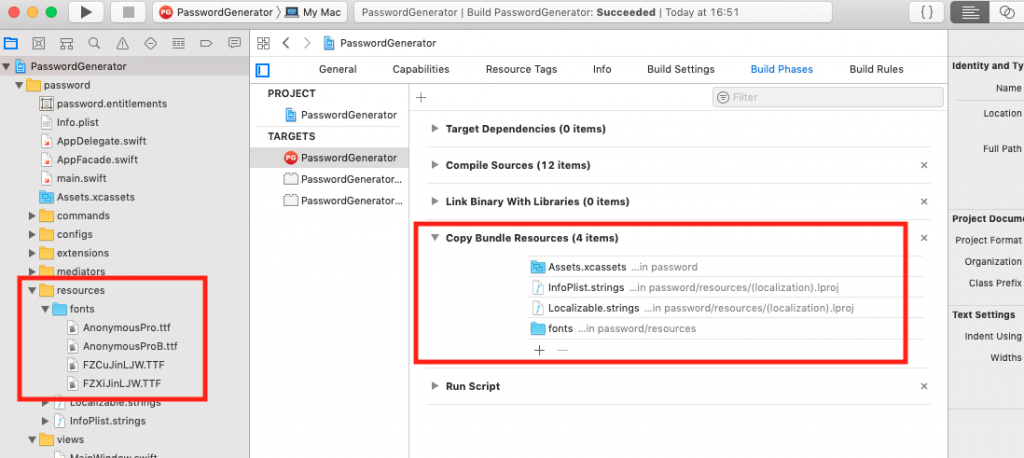
将字体文件拖拽(添加)到项目的资源库中。范例如下图:

2. 修改Info.plist文件

新增Fonts provided by application及Application fonts resource path两项。

  • Fonts provided by application选Array类型,每个item后填上一个字体文件的路径,新增了多少个字体文件,就填写多少个item
  • Application fonts resource path选String类型,填上字体文件所在目录路径即可。

注意:Application fonts resource path是Mac OS App项目必填的,否则找不到字体文件,这点是与iOS项目不一样的,iOS项目只需要填写Fonts provided by application即可。范例如下图:

完成上述两个步骤,即可使用自定义字体了。

extension NSFont {
    class func mainBoldFont(size: CGFloat) -> NSFont {
        let font = NSFont(name: "FZCUJINLJW--GB1-0", size: size)
        return font ?? NSFont.systemFont(ofSize: size)
    }
    
    class func mainFont(size: CGFloat) -> NSFont {
        let font = NSFont(name: "FZXIJINLJW--GB1-0", size: size)
        return font ?? NSFont.systemFont(ofSize: size)
    }
}

Mac OS App的storyboard中无法直接使用自定义的字体,但是可以在代码中使用,这个问题我没找到原因,如果您找到了方法请告知我。谢谢!

PS: 查看所有可用字体代码片段

let manager = NSFontManager.shared
for name: String in manager.availableFonts {
    print("font name=====" + name)
}

在使用Gradle打包成一个可运行的Jar包的时候,需要把编译时依赖的库也打包进去,因此要搞清楚打包时如何才能将库文件打包进去。

对于implementation引入的库,则需要如下的语句:

from {
        configurations.runtimeClasspath.collect { it.isDirectory() ? it : zipTree(it) }
    }

对于testImplementation引入的库,则需要如下的语句:

from {
        configurations.testRuntimeClasspath.collect { it.isDirectory() ? it : zipTree(it) }
    }

我们只需要打包运行时的依赖包即可,则完整build.gradle如下:

plugins {
    id 'java'
    id 'org.jetbrains.kotlin.jvm' version '1.3.21'
}

group 'com.zhuyanbin'
version '1.0.0'

sourceCompatibility = 1.8

repositories {
    mavenCentral()
}

jar {
    manifest {
        attributes 'Implementation-Title' : 'DropBox-Backup-Service'
        attributes 'Manifest-Version': '1.0.0'
        attributes 'Main-Class': 'com.zhuyanbin.dropbox.AppKt'
    }

    from {
        configurations.runtimeClasspath.collect { it.isDirectory() ? it : zipTree(it) }
    }
}

dependencies {

    implementation "org.jetbrains.kotlin:kotlin-stdlib-jdk8"
    implementation 'com.dropbox.core:dropbox-core-sdk:3.0.10'
    implementation 'commons-configuration:commons-configuration:1.9'
    testImplementation group: 'org.junit.platform', name: 'junit-platform-launcher', version:'1.4.0'
    testImplementation group: 'org.junit.jupiter', name: 'junit-jupiter-engine', version:'5.4.0'
    testImplementation group: 'org.junit.vintage', name: 'junit-vintage-engine', version:'5.4.0'
}

compileKotlin {
    kotlinOptions.jvmTarget = "1.8"
}
compileTestKotlin {
    kotlinOptions.jvmTarget = "1.8"
}

The following graph describes the main configurations setup when the Java Library plugin is in use.

  • The configurations in green are the ones a user should use to declare dependencies
  • The configurations in pink are the ones used when a component compiles, or runs against the library
  • The configurations in blue are internal to the component, for its own use
  • The configurations in white are configurations inherited from the Java plugin

And the next graph describes the test configurations setup:

The compiletestCompileruntime and testRuntime configurations inherited from the Java plugin are still available but are deprecated. You should avoid using them, as they are only kept for backwards compatibility.

The role of each configuration is described in the following tables:

Table 1. Java Library plugin – configurations used to declare dependencies

Configuration nameRoleConsumable?Resolvable?Description
apiDeclaring API dependenciesnonoThis is where you should declare dependencies which are transitively exported to consumers, for compile.
implementationDeclaring implementation dependenciesnonoThis is where you should declare dependencies which are purely internal and not meant to be exposed to consumers.
compileOnlyDeclaring compile only dependenciesyesyesThis is where you should declare dependencies which are only required at compile time, but should not leak into the runtime. This typically includes dependencies which are shaded when found at runtime.
runtimeOnlyDeclaring runtime dependenciesnonoThis is where you should declare dependencies which are only required at runtime, and not at compile time.
testImplementationTest dependenciesnonoThis is where you should declare dependencies which are used to compile tests.
testCompileOnlyDeclaring test compile only dependenciesyesyesThis is where you should declare dependencies which are only required at test compile time, but should not leak into the runtime. This typically includes dependencies which are shaded when found at runtime.
testRuntimeOnlyDeclaring test runtime dependenciesnonoThis is where you should declare dependencies which are only required at test runtime, and not at test compile time.

Table 2. Java Library plugin — configurations used by consumers

Configuration nameRoleConsumable?Resolvable?Description
apiElementsFor compiling against this libraryyesnoThis configuration is meant to be used by consumers, to retrieve all the elements necessary to compile against this library. Unlike the default configuration, this doesn’t leak implementation or runtime dependencies.
runtimeElementsFor executing this libraryyesnoThis configuration is meant to be used by consumers, to retrieve all the elements necessary to run against this library.

Table 3. Java Library plugin – configurations used by the library itself

Configuration nameRoleConsumable?Resolvable?Description
compileClasspathFor compiling this librarynoyesThis configuration contains the compile classpath of this library, and is therefore used when invoking the java compiler to compile it.
runtimeClasspathFor executing this librarynoyesThis configuration contains the runtime classpath of this library
testCompileClasspathFor compiling the tests of this librarynoyesThis configuration contains the test compile classpath of this library.
testRuntimeClasspathFor executing tests of this librarynoyesThis configuration contains the test runtime classpath of this library

Link: https://docs.gradle.org/current/userguide/java_library_plugin.html

The key difference between the standard Java plugin and the Java Library plugin is that the latter introduces the concept of an APIexposed to consumers. A library is a Java component meant to be consumed by other components. It’s a very common use case in multi-project builds, but also as soon as you have external dependencies.

The plugin exposes two configurations that can be used to declare dependencies: api and implementation. The apiconfiguration should be used to declare dependencies which are exported by the library API, whereas the implementationconfiguration should be used to declare dependencies which are internal to the component.

Example 2. Declaring API and implementation dependencies

dependencies {
    api("commons-httpclient:commons-httpclient:3.1")
    implementation("org.apache.commons:commons-lang3:3.5")
}

Dependencies appearing in the api configurations will be transitively exposed to consumers of the library, and as such will appear on the compile classpath of consumers. Dependencies found in the implementation configuration will, on the other hand, not be exposed to consumers, and therefore not leak into the consumers’ compile classpath. This comes with several benefits:

  • dependencies do not leak into the compile classpath of consumers anymore, so you will never accidentally depend on a transitive dependency
  • faster compilation thanks to reduced classpath size
  • less recompilations when implementation dependencies change: consumers would not need to be recompiled
  • cleaner publishing: when used in conjunction with the new maven-publish plugin, Java libraries produce POM files that distinguish exactly between what is required to compile against the library and what is required to use the library at runtime (in other words, don’t mix what is needed to compile the library itself and what is needed to compile against the library).

If your build consumes a published module with POM metadata, the Java and Java Library plugins both honor api and implementation separation through the scopes used in the pom. Meaning that the compile classpath only includes compilescoped dependencies, while the runtime classpath adds the runtime scoped dependencies as well.

This often does not have an effect on modules published with Maven, where the POM that defines the project is directly published as metadata. There, the compile scope includes both dependencies that were required to compile the project (i.e. implementation dependencies) and dependencies required to compile against the published library (i.e. API dependencies). For most published libraries, this means that all dependencies belong to the compile scope. However, as mentioned above, if the library is published with Gradle, the produced POM file only puts api dependencies into the compile scope and the remaining implementation dependencies into the runtime scope.

link: https://docs.gradle.org/current/userguide/java_library_plugin.html

使用Docker编译Kotlin时,遇到了如下报错:

FAILURE: Build failed with an exception.

* What went wrong:
Could not create service of type ScriptPluginFactory using BuildScopeServices.createScriptPluginFactory().
> Could not create service of type CrossBuildFileHashCache using BuildSessionScopeServices.createCrossBuildFileHashCache().

* Try:
Run with --stacktrace option to get the stack trace. Run with --info or --debug option to get more log output. Run with --scan to get full insights.

* Get more help at https://help.gradle.org

BUILD FAILED in 2s

我的Dockerfile如下:

FROM gradle:5.2.1-jdk8 as builder
COPY ./ /data/dropbox/
WORKDIR /data/dropbox
RUN gradle build --no-daemon

经过排查,发现是权限问题,无法启动gradle进行编译,因此加入如下一句:

USER root

即可成功通过。完整Dockerfile如下:

FROM gradle:5.2.1-jdk8 as builder
COPY ./ /data/dropbox/
USER root
WORKDIR /data/dropbox
RUN gradle build --no-daemon

自 17.05 版本开始,Docker 支持多步骤镜像创建( Multi-stage build)特性,可以精简最终生成的镜像大小 。

对于需要编译的应用(如 CGoJava语言等)来说,通常情况下至少需要准备两个 环境的 Docker镜像:

  • 编译环境镜像 : 包括完整的编译引擎、依赖库等,往往比较庞大。作用是编译应用为二进制文件;
  • 运行环境镜像: 利用编译好的二进制文件,运行应用,由于不需要编译环境,体积比较小。

使用多步骤创建,可以在保证最终生成的运行环境镜像保持精筒的情况下,使用单一的Dockerfile,降低维护复杂度 。

Go语言应用为例。创建干净目录,进入到目录中,创建main.go文件,内容为:

// main.go will output "Hello, Docker"
package main

import ("fmt")

func main() {
    fmt.println("Hello, Docker")
}

创建 Dockerfile,使用 golang:1.9镜像编译应用二进制文件为 app,使用精简的镜像 alpine:latest 作为运行环境 。Dockerfile 完整内容为:

FROM golang:1.9 as builder # define stage name as builder
RUN mkdir -p /go/src/test
WORKDIR /go/src/test
COPY main.go
RUN CGO_ENABLED=O GOOS=linux go build -o app

FROM alpine:latest
RUN apk –no-cache add ca-certificates
WORKDIR /root/
COPY –from=builder /go/src/test/app . # copy file from the builder stage
CMD ["./app"]

执行如下命令创建镜像,并运行应用:

$ docker build -t yeasy/test multistage:latest .
Sending build context to Docker daemon 3.072kB
Step 1/10 : FROM golang:1.9
Successfully built 5fd0cb93dda0
Successfully tagged yeasy/test-multistage:latest 
$ docker run --rm yeasy/test-m ultistage:latest
Hello, Docker

查看生成的最终镜像,大小只有 6.55 MB:

$docker images | grep test-multistage
yeasy/test-multistage latest 5fd0cb93dda0 1 minutes ago 6.55MB

文章来源:

《Docker技术入门与实践》第三版 杨保华、戴王剑、曹亚仑 编著

1. dd命令

dd:用指定大小的块拷贝一个文件,并在拷贝的同时进行指定的转换。

注意:指定数字的地方若以下列字符结尾,则乘以相应的数字:b=512;c=1; k=1024;w=2

参数注释:

  1. if=文件名:输入文件名,缺省为标准输入。即指定源文件。< if=input file >
  2. of=文件名:输出文件名,缺省为标准输出。即指定目的文件。< of=output file >
  3. ibs=bytes:一次读入bytes个字节,即指定一个块大小为bytes个字节。
    obs=bytes:一次输出bytes个字节,即指定一个块大小为bytes个字节。
    bs=bytes:同时设置读入/输出的块大小为bytes个字节。
  4. cbs=bytes:一次转换bytes个字节,即指定转换缓冲区大小。
  5. skip=blocks:从输入文件开头跳过blocks个块后再开始复制。
  6. seek=blocks:从输出文件开头跳过blocks个块后再开始复制。
    注意:通常只用当输出文件是磁盘或磁带时才有效,即备份到磁盘或磁带时才有效。
  7. count=blocks:仅拷贝blocks个块,块大小等于ibs指定的字节数。
  8. conv=conversion:用指定的参数转换文件。
    • ascii:转换ebcdic为ascii
    • ebcdic:转换ascii为ebcdic
    • ibm:转换ascii为alternate ebcdic
    • block:把每一行转换为长度为cbs,不足部分用空格填充
    • unblock:使每一行的长度都为cbs,不足部分用空格填充
    • lcase:把大写字符转换为小写字符
    • ucase:把小写字符转换为大写字符
    • swab:交换输入的每对字节
    • noerror:出错时不停止
    • notrunc:不截短输出文件
    • sync:将每个输入块填充到ibs个字节,不足部分用空(NUL)字符补齐。

2. dd应用实例

1. 将本地的/dev/hdb整盘备份到/dev/hdd

$ dd if=/dev/hdb of=/dev/hdd

2. 将/dev/hdb全盘数据备份到指定路径的image文件

$ dd if=/dev/hdb of=/root/image

3. 将备份文件恢复到指定盘

$ dd if=/root/image of=/dev/hdb

4. 备份/dev/hdb全盘数据,并利用gzip工具进行压缩,保存到指定路径

$ dd if=/dev/hdb | gzip > /root/image.gz

5. 将压缩的备份文件恢复到指定盘

$ gzip -dc /root/image.gz | dd of=/dev/hdb

6. 备份与恢复MBR

备份磁盘开始的512个字节大小的MBR信息到指定文件:

$ dd if=/dev/hda of=/root/image count=1 bs=512

count=1指仅拷贝一个块;bs=512指块大小为512个字节。

恢复:

$ dd if=/root/image of=/dev/had

将备份的MBR信息写到磁盘开始部分

7. 备份软盘

$ dd if=/dev/fd0 of=disk.img count=1 bs=1440k (即块大小为1.44M)

8. 拷贝内存内容到硬盘

$ dd if=/dev/mem of=/root/mem.bin bs=1024 (指定块大小为1k)

9. 拷贝光盘内容到指定文件夹,并保存为cd.iso文件

$ dd if=/dev/cdrom(hdc) of=/root/cd.iso

10. 增加swap分区文件大小

第一步:创建一个大小为256M的文件:

$ dd if=/dev/zero of=/swapfile bs=1024 count=262144

第二步:把这个文件变成swap文件:

$ mkswap /swapfile

第三步:启用这个swap文件:

$ swapon /swapfile

第四步:编辑/etc/fstab文件,使在每次开机时自动加载swap文件:

$ /swapfile swap swap default 0 0

11. 销毁磁盘数据

$ dd if=/dev/urandom of=/dev/hda1

注意:利用随机的数据填充硬盘,在某些必要的场合可以用来销毁数据。

12. 测试硬盘的写速度

$ dd if=/dev/zero bs=1024 count=1000000 of=/root/1Gb.file

通过以上命令输出的命令执行时间,可以计算出硬盘的写速度。

13. 测试硬盘的读速度

$ dd if=/root/1Gb.file bs=64k | dd of=/dev/null

通过以上命令输出的命令执行时间,可以计算出硬盘的读速度。

14. 确定硬盘的最佳块大小

$ dd if=/dev/zero bs=1024 count=1000000 of=/root/1Gb.file
$ dd if=/dev/zero bs=2048 count=500000 of=/root/1Gb.file
$ dd if=/dev/zero bs=4096 count=250000 of=/root/1Gb.file
$ dd if=/dev/zero bs=8192 count=125000 of=/root/1Gb.file

通过比较以上命令输出中所显示的命令执行时间,即可确定系统最佳的块大小。

15. 修复硬盘

$ dd if=/dev/sda of=/dev/sda

或者

$ dd if=/dev/hda of=/dev/hda

当硬盘较长时间(一年以上)放置不使用后,磁盘上会产生magnetic flux point,当磁头读到这些区域时会遇到困难,并可能导致I/O错误。当这种情况影响到硬盘的第一个扇区时,可能导致硬盘报废。上边的命令有可能使这些数 据起死回生。并且这个过程是安全、高效的。

16. 利用netcat远程备份

$ dd if=/dev/hda bs=16065b | netcat < targethost-IP > 1234

在源主机上执行此命令备份/dev/hda

netcat -l -p 1234 | dd of=/dev/hdc bs=16065b

在目的主机上执行此命令来接收数据并写入/dev/hdc

$ netcat -l -p 1234 | bzip2 > partition.img
$ netcat -l -p 1234 | gzip > partition.img

以上两条指令是目的主机指令的变化分别采用bzip2、gzip对数据进行压缩,并将备份文件保存在当前目录。

17. 将一个很大的视频文件中的第i个字节的值改成0x41(也就是大写字母A的ASCII值)

$ echo A | dd of=bigfile seek=$i bs=1 count=1 conv=notrunc

3. /dev/null和/dev/zero的区别

  • /dev/null,外号叫无底洞,你可以向它输出任何数据,它通吃,并且不会撑着!它是空设备,也称为位桶(bit bucket)。任何写入它的输出都会被抛弃。如果不想让消息以标准输出显示或写入文件,那么可以将消息重定向到位桶。
  • /dev/zero,是一个输入设备,你可你用它来初始化文件。该设备无穷尽地提供0,可以使用任何你需要的数目——设备提供的要多的多。他可以用于向设备或文件写入字符串0。

Link: http://www.linuxde.net/2013/03/12928.html