Linux默认情况下使用UTC格式作为标准时间格式,如果在Linux下运行程序,且在程 序中指定了与系统不一样的时区的时候,可能会造成时间错误。如果是Ubuntu的桌面版,则可以直接在图形模式下修改时区信息,但如果是在Server版 呢,则需要通过tzconfig来修改时区信息了。使用方式(如将时区设置成Asia/Chongqing):


sudo tzconfig,如果命令不存在请使用 dpkg-reconfigure tzdata

然后按照提示选择 Asia对应的序号,选完后会显示一堆新的提示—输入城市名,如Shanghai或Chongqing,最后再用 sudo date -s “” 来修改本地时间。

按照提示进行选择时区,然后:

sudo cp /usr/share/zoneinfo/Asia/ShangHai /etc/localtime

上面的命令是防止系统重启后时区改变。


网上同步时间

1.  安装ntpdate工具

# sudo apt-get install ntpdate

2.  设置系统时间与网络时间同步

# ntpdate cn.pool.ntp.org

3.  将系统时间写入硬件时间

# hwclock –systohc

cn.pool.ntp.org是位于中国的公共NTP服务器,用来同步你的时间(如果你的时间与服务器的时间截不同的话,可能无法同步时间哟,甚至连sudo reboot这样的指令也无法执行)。


link: http://www.cnblogs.com/php5/archive/2011/02/15/1955432.html

Valgrind简介:

Valgrind是动态分析工具的框架。有很多Valgrind工具可以自动的检测许多内存管理和多进程/线程的bugs,在细节上剖析你的程序。你也可以利用Valgrind框架来实现自己的工具。

Valgrind通常包括6个工具:一个内存错误侦测工具,两个线程错误侦测工具,cache和分支预测的分析工具,堆的分析工具。

Valgrind的使用与CPU OS以及编译器和C库都有关系。目前支持下面的平台:

– x86/Linux

– AMD64/Linux

– PPC32/Linux

– PPC64/Linux

– ARM/Linux

– x86/MacOSX

– AMD64/MacOSX


Valgrind是GNU v2下的开源软件,你可以从http://valgrind.org下载最新的源代码。


Valgrind的安装:

1.从http://valgrind.org下载最新的valgrind-3.7.0.tar.bz2d,用tar -xfvalgrind-3.7.0.tar.bz2解压安装包。

2.执行./configure,检查安装要求的配置。

3.执行make。

4.执行make install,最好是用root权限。

5.试着valgrind ls -l来检测是否正常工作。


Valgrind的概述:

Valgrind时建立动态分析工具的框架。它有一系列用于调试分析的工具。Valgrind的架构是组件化的,所以可以方便的添加新的工具而不影响当前的结构。


下面的工具是安装时的标准配置:

Memcheck:用于检测内存错误。它帮助c和c++的程序更正确。

Cachegrind:用于分析cache和分支预测。它帮助程序执行得更快。

Callgrind:用于函数调用的分析。

Helgrind:用于分析多线程。

DRD:也用于分析多线程。与Helgrind类似,但是用不同的分析技术,所以可以检测不同的问题。

Massif:用于分析堆。它帮助程序精简内存的使用。

SGcheck:检测栈和全局数组溢出的实验性工具,它和Memcheck互补使用。


Valgrind的使用:

1.准备好程序:

编译程序时用-g,这样编译后的文件包含调试信息,那Memcheck的分析信息中就包含正确的行号。最好使用-O0的优化等级,使用-O2及以上的优化等级使用时可能会有问题。

2.在Memcheck下运行程序:

如果你的程序执行如下:

myprog arg1 arg2

那么使用如下:

valgrind –leak-check=yes myprog arg1 arg2

Memcheck是默认的工具。–leak-check打开内存泄漏检测的细节。

在上面的命令中运行程序会使得程序运行很慢,而且占用大量的内存。Memcheck会显示内存错误和检测到的内存泄漏。

3.如何查看Memcheck的输出:

这里有一个实例c代码(a.c),有一个内存错误和一个内存泄漏。

#include <stdlib.h>

void f(void)

{

int*x = (int *)malloc(10 * sizeof(int));

x[10]= 0;

//problem 1: heap block overrun

}        //problem 2: memory leak — x not freed


int main(void)

{

f();

return0;

}


运行如下:

huerjia@huerjia:~/NFS/valg/test$ valgrind–leak-check=yes ./a

==24780== Memcheck, a memory error detector

==24780== Copyright (C) 2002-2011, and GNUGPL’d, by Julian Seward et al.

==24780== Using Valgrind-3.7.0 and LibVEX;rerun with -h for copyright info

==24780== Command: ./a

==24780==

==24780== Invalid write of size 4

==24780==   at 0x80484DF: f() (a.c:5)

==24780==   by 0x80484F1: main (a.c:11)

==24780== Address 0x42d3050 is 0 bytes after a block of size 40 alloc’d

==24780==   at 0x4026444: malloc (vg_replace_malloc.c:263)

==24780==   by 0x80484D5: f() (a.c:4)

==24780==   by 0x80484F1: main (a.c:11)

==24780==

==24780==

==24780== HEAP SUMMARY:

==24780==     in use at exit: 40 bytes in 1 blocks

==24780==  total heap usage: 1 allocs, 0 frees, 40 bytes allocated

==24780==

==24780== 40 bytes in 1 blocks aredefinitely lost in loss record 1 of 1

==24780==   at 0x4026444: malloc (vg_replace_malloc.c:263)

==24780==   by 0x80484D5: f() (a.c:4)

==24780==   by 0x80484F1: main (a.c:11)

==24780==

==24780== LEAK SUMMARY:

==24780==   definitely lost: 40 bytes in 1 blocks

==24780==   indirectly lost: 0 bytes in 0 blocks

==24780==      possibly lost: 0 bytes in 0 blocks

==24780==   still reachable: 0 bytes in 0 blocks

==24780==         suppressed: 0 bytes in 0 blocks

==24780==

==24780== For counts of detected andsuppressed errors, rerun with: -v

==24780== ERROR SUMMARY: 2 errors from 2contexts (suppressed: 17 from 6)


如何来阅读这个输出结果:

==24780== Memcheck, a memory error detector

==24780== Copyright (C) 2002-2011, and GNUGPL’d, by Julian Seward et al.

==24780== Using Valgrind-3.7.0 and LibVEX;rerun with -h for copyright info

==24780== Command: ./a

这一部分是显示使用的工具以及版本信息。其中24780是Process ID。


==24780== Invalid write of size 4

==24780==   at 0x80484DF: f() (a.c:5)

==24780==   by 0x80484F1: main (a.c:11)

==24780== Address 0x42d3050 is 0 bytes after a block of size 40 alloc’d

==24780==   at 0x4026444: malloc (vg_replace_malloc.c:263)

==24780==   by 0x80484D5: f() (a.c:4)

==24780==   by 0x80484F1: main (a.c:11)

这部分指出了错误:Invalid write。后面的几行显示了函数堆栈。


==24780== HEAP SUMMARY:

==24780==     in use at exit: 40 bytes in 1 blocks

==24780==  total heap usage: 1 allocs, 0 frees, 40 bytes allocated

==24780==

==24780== 40 bytes in 1 blocks aredefinitely lost in loss record 1 of 1

==24780==   at 0x4026444: malloc (vg_replace_malloc.c:263)

==24780==   by 0x80484D5: f() (a.c:4)

==24780==   by 0x80484F1: main (a.c:11)

==24780==

==24780== LEAK SUMMARY:

==24780==   definitely lost: 40 bytes in 1 blocks

==24780==   indirectly lost: 0 bytes in 0 blocks

==24780==      possibly lost: 0 bytes in 0 blocks

==24780==   still reachable: 0 bytes in 0 blocks

==24780==         suppressed: 0 bytes in 0 blocks

这部分是对堆和泄漏的总结,可以看出内存泄漏的错误。


==24780== For counts of detected andsuppressed errors, rerun with: -v

==24780== ERROR SUMMARY: 2 errors from 2contexts (suppressed: 17 from 6)

这部分是堆所有检测到的错误的总结。代码中的两个错误都检测到了。


Helgrind:线程错误检测工具

若使用这个工具,在Valgrind的命令中添加–tool=helgrind。

Helgrind用于c,c++下使用POSIXpthreads的程序的线程同步错误。

Helgrind可以检测下面三类错误:

1.POSIX pthreads API的错误使用

2.由加锁和解锁顺序引起的潜在的死锁

3.数据竞态–在没有锁或者同步机制下访问内存


以数据竞态为例来说明Helgrind的用法:

在不使用合适的锁或者其他同步机制来保证单线程访问时,两个或者多个线程访问同一块内存就可能引发数据竞态。

一个简单的数据竞态的例子:

#include <pthread.h>


int var = 0;


void* child_fn ( void* arg ) {

var++;/* Unprotected relative to parent */ /* this is line 6 */

returnNULL;

}


int main ( void ) {

pthread_tchild;

pthread_create(&child,NULL, child_fn, NULL);

var++;/* Unprotected relative to child */ /* this is line 13 */

pthread_join(child,NULL);

return0;

}


运行如下:

huerjia@huerjia:~/NFS/valg/test$ valgrind–tool=helgrind ./b

==25449== Helgrind, a thread error detector

==25449== Copyright (C) 2007-2011, and GNUGPL’d, by OpenWorks LLP et al.

==25449== Using Valgrind-3.7.0 and LibVEX;rerun with -h for copyright info

==25449== Command: ./b

==25449==

==25449==—Thread-Announcement——————————————

==25449==

==25449== Thread #1 is the program’s rootthread

==25449==

==25449== —Thread-Announcement——————————————

==25449==

==25449== Thread #2 was created

==25449==   at 0x4123A38: clone (in /lib/tls/i686/cmov/libc-2.11.1.so)

==25449==   by 0x40430EA: pthread_create@@GLIBC_2.1 (in /lib/tls/i686/cmov/libpthread-2.11.1.so)

==25449==   by 0x402A9AD: pthread_create_WRK (hg_intercepts.c:255)

==25449==   by 0x402AA85: pthread_create@* (hg_intercepts.c:286)

==25449==   by 0x80484E1: main (b.c:11)

==25449==

==25449==—————————————————————-

==25449==

==25449== Possible data race during read ofsize 4 at 0x804A020 by thread #1

==25449== Locks held: none

==25449==   at 0x80484E2: main (b.c:12)

==25449==

==25449== This conflicts with a previouswrite of size 4 by thread #2

==25449== Locks held: none

==25449==   at 0x80484A7: child_fn (b.c:6)

==25449==   by 0x402AB04: mythread_wrapper (hg_intercepts.c:219)

==25449==   by 0x404296D: start_thread (in /lib/tls/i686/cmov/libpthread-2.11.1.so)

==25449==   by 0x4123A4D: clone (in /lib/tls/i686/cmov/libc-2.11.1.so)

==25449==

==25449==—————————————————————-

==25449==

==25449== Possible data race during writeof size 4 at 0x804A020 by thread #1

==25449== Locks held: none

==25449==   at 0x80484E2: main (b.c:12)

==25449==

==25449== This conflicts with a previouswrite of size 4 by thread #2

==25449== Locks held: none

==25449==   at 0x80484A7: child_fn (b.c:6)

==25449==   by 0x402AB04: mythread_wrapper (hg_intercepts.c:219)

==25449==   by 0x404296D: start_thread (in /lib/tls/i686/cmov/libpthread-2.11.1.so)

==25449==   by 0x4123A4D: clone (in /lib/tls/i686/cmov/libc-2.11.1.so)

==25449==

==25449==

==25449== For counts of detected andsuppressed errors, rerun with: -v

==25449== Use –history-level=approx or=none to gain increased speed, at

==25449== the cost of reduced accuracy ofconflicting-access information

==25449== ERROR SUMMARY: 2 errors from 2contexts (suppressed: 0 from 0)


错误信息从“Possible data race during write of size 4 at 0x804A020 by thread #1

”开始,这条信息你可以看到竞态访问的地址和大小,还有调用的堆栈信息。

第二条调用堆栈从“This conflicts with a previous write of size 4 by thread #2

”开始,这表明这里与第一个调用堆栈有竞态。


一旦你找到两个调用堆栈,如何找到竞态的根源:

首先通过每个调用堆栈检查代码,它们都会显示对同一个位置或者变量的访问。

现在考虑如何改正来使得多线程访问安全:

1.使用锁或者其他的同步机制,保证同一时间只有独立的访问。

2.使用条件变量等方法,确定多次访问的次序。


本文介绍了valgrind的体系结构,并重点介绍了其应用最广泛的工具:memcheck和helgrind。阐述了memcheck和helgrind的基本使用方法。在项目中尽早的发现内存问题和多进程同步问题,能够极大地提高开发效率,valgrind就是能够帮助你实现这一目标的出色工具。


link: http://blog.csdn.net/dndxhej/article/details/7855520
We introduced Stage3D last year and the momentum behind has never stopped growing but there is one area we did not give all the details. The ATF file format, it is mentioned here and there, so what’s up with this? Some of you may have seen it in the documentation for Stage3D referred as the compressed texture file format, but we never shared any tools to create those famous ATF textures.

Before we package the ATF tools with the AIR SDK, I am happy to share here in advance the ATF tools so that you guys can start leveraging the ATF format now!

So what is it?

First, let’s start by talking about what compressed textures are.

When doing GPU programming with any technology, you have two options for how you handle your textures. You can go compressed or uncompressed, very simple. So, what is the difference?

  1. When using uncompressed textures, a good old uncompressed file format like PNG is used and uploaded to the GPU.
  2. Because GPUs don’t support such a file format natively, your texture is actually stored in CPU memory, when it could actually be stored on the GPU memory!
  3. Same thing applies for JPEG images, make no mistake, graphics chipsets don’t know anything about JPEG which would also be decoded on CPU memory.
  4. Of course, each platform has different support for compressed textures depending on the hardware chipset being used.
Now get ready for the fun! Here is below a little table to illustrate it:
Platform Format
ImgTech (iOS) PVRTC
Qualcom (Android) ETC1
Mali (Android) ETC1
NVidia (Android) ETC1/DXT1/DXT5
Android (PowerVR) PVRTC/ETC1
Windows DXT1/DXT5
MacOS DXT1/DXT5


Why ATF?

As you can imagine, if you would develop a game targeting iOS, Android and desktop, you would need to supply your textures compressed to each format for each platform. Which would look like this:

  1. leaf.png encoded to DXT for Windows and MacOS
  2. leaf.png encoded to ETC1 or DXT for Android (Nvidia)
  3. leaf.png encoded to PVRTC for iOS (ImgTech)

Of course it is a pain to provide all the different versions of the textures, detect at runtime which platform you are running on and upload the corresponding texture. Wouldn’t it be cool if you could just rely on one single container, that would wrap all the textures for each platform and Flash Player or AIR would extract automatically the texture required depending on the platform? So here comes ATF.

The ATF internals

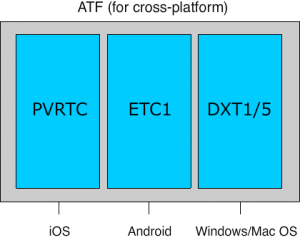
Really, think about the ATF format as a container for lossy images. Here is below a little figure showing very sinply the structure of a default compressed ATF file:

01

By default, all textures format (PVRTC (4bpp), ETC1, and DXT1/5) are embedded in the ATF file so that for each platform, AIR or Flash Player automatically extracts the appropriate texture. But in some cases, you may want to target mobile only and why should you embed desktop related textures or Android if you are targeting iOS only? To cover this, you can also embed the PVRTC textures only inside the ATF file, making your assets smaller.

The figure below illustrate the idea:

02

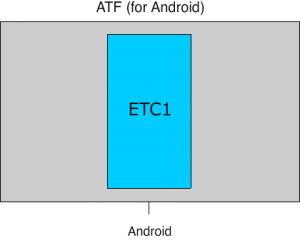
As you can imagine, the same applies to ETC1 if you are targeting Android:

03

If you know about ETC1, you may wonder how we handle transparency then? We use a dual ETC1 approach with two textures, one for the alpha channel and one for the colors.

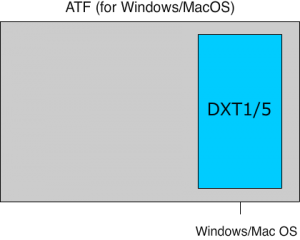
And finally on desktop only, where only the DXT texture can be provided:

04

The difference between DXT1 and DXT5 resides in alpha support. DXT1 does not support transparency, DXT5 does. Automatically the ATF tools will detect if your images have transparency and select the proper DXT version for you. Also note that ATF is not alpha pre-multiplied.

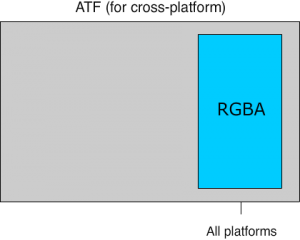
Now, if you want to store uncompressed textures inside an ATF file, you can also do that:

05

Why would you do that you may ask? Well, you may want to use uncompressed textures but still want to leverage cubemap, automatic mipmap support or even texture streaming.

Ok, now apart from the fact that hardware requires those textures to be compressed, what is the value for your content?

Yes, what does it bring you?

  • Faster rendering
  • Lower texture memory requirements (extremely important on devices like the iPad1 where memory is very limited)
  • Faster texture uploads into texture memory
  • Automatic generation of all required mip-maps (note that you can disable this if needed).
  • Additionally, the use of compress textures allows the application to utilize higher resolution textures with the same memory footprint.
Now the question is, how do you create such ATF files? It is very easy, we provide a few command line tools for that. Let’s have a look at how it works.

How to use the tools

The main tool you need to know about is png2atf , which as you can guess, takes a png and gives you an ATF file:

//package leaf.png with all 3 formats (DXT5, PVRTC and ETC1x2)
C:\png2atf.exe  -c  -i  leaf.png  -o  leaf.atf
[In 213KB][Out 213KB][Ratio 99.9703%][LZMA:0KB JPEG-XR:213KB]

//package specific range of mipmaps
C:\png2atf.exe  -c  -n  0,5  -i  leaf.png  -o  leaf0,5.atf
[In 213KB][Out 213KB][Ratio 99.8825%][LZMA:0KB JPEG-XR:213KB]

//package only DXT format
C:\png2atf.exe  -c d  -i  leaf.png  -o  leaf_dxt5.atf
[In 85KB][Out 85KB][Ratio 100.045%][LZMA:0KB JPEG-XR:85KB]

//package only ETC1 format
C:\png2atf.exe  -c e  -i  leaf.png  -o  leaf_etc1.atf
[In 85KB][Out 85KB][Ratio 100.045%][LZMA:0KB JPEG-XR:85KB]

//package only PVRTC format
C:\png2atf.exe  -c p  -i  leaf.png  -o  leaf_pvrtc.atf
[In 42KB][Out 42KB][Ratio 100.089%][LZMA:0KB JPEG-XR:42KB]

As mentioned earlier, what if you wanted to store uncompressed a uncompressed texture inside your ATF? For this, just don’t use the -c argument:

//package as uncompressed (RGBA) format
C:\png2atf.exe  -i  leaf.png  -o  leaf_rgba.atf
[In 341KB][Out 43KB][Ratio 12.8596%][LZMA:0KB JPEG-XR:43KB]

Another cool feature is that ATF can also be used with streaming, to generate 3 sub-files you can do this:

png2atf -m -n 0,0 -c -i cubecat0.png -o cubecat_c_high.atf
png2atf -m -n 1,2 -c -i cubecat0.png -o cubecat_c_med.atf
png2atf -m -n 3,20 -c -i cubecat0.png -o cubecat_c_low.atf

For info, texture support streaming shipped in Flash Player 11.3/AIR 3.3. Make sure to create the texture with streaming on, by using the streamingLevel arguments of the Texture.createTexture() API.

If you have used the texturetool from Apple to generate your PVR textures, this is the same approach. Another tool called pvr2atf , which is a command line utility converts PVR texture files to ATF files. The tool works similarly to png2atf except that you have to provide input files in the PVR texture format.

To convert a PVR file to an RGB or RGBA ATF file run the command as such:

C:\> pvr2atf -i test.pvr -o test.atf
[In 4096KB][Out 410KB][Ratio 10.0241%][LZMA:0KB JPEG-XR:410KB]

Also, you can use ATF for a cubemap texture:

//to create a ATF for cubemap texture,
//prepare png file for each side of the cube as:
// -X: cube0.png
//+X: cube1.png
// -Y: cube2.png
//+Y: cube3.png
// -Z: cube4.png
//+Z: cube5.png
C:\png2atf.exe  -c   -m  -i  cube0.png  -o  cube.atf

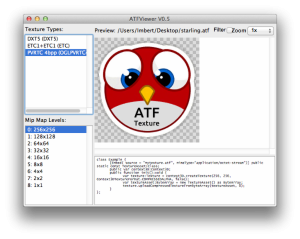
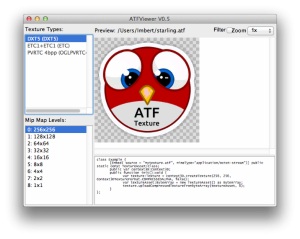
ATFViewer is a GUI tool which previews and inspects ATF files. The primary purpose is to audit DXT1, ETC1 and PVRTC compression artifacts. You can open and view ATF files by either using the ‘Open…’ menu item or by dragging a file from Explorer into the window. The Snippet preview area shows you an example of how to load a particular ATF file in raw ActionScript 3 Stage3D code.

Below is an example of a test file from Starling, you can preview the texture for each format and also have a little code snippet at the bottom which tells you how to use it in ActionScript 3 with Stage3D:

06

Note that when opening an ATF texture containing only specific compression, the ATFViewer will show this, below we opened an ATF file containing only the DXT textures, you can see that ETC1 and PVRTC in the texture types list are greyed out:

07

Let’s have a look now at how we can use compressed textures with the Stage3D APIs.

Using compressed textures with Stage3D

To use compressed textures with Stage3D, you need to use theTexture.uploadCompressedTextureFromByteArray API with one of the two relatedContext3DTextureFormat constants (Context3DTextureFormat.COMPRESSED_ALPHA andContext3DTextureFormat.COMPRESSED ):

class Example {
[Embed( source = "mytexture.atf", mimeType="application/octet-stream")]
public static const TextureAsset:Class;
public var context3D:Context3D;

public function init():void{
var texture:Texture = context3D.createTexture(256, 256, Context3DTextureFormat.COMPRESSED_ALPHA, false);
var textureAsset:ByteArray = new TextureAsset() as ByteArray;
texture.uploadCompressedTextureFromByteArray(textureAsset, 0);
}
};

In the context of a cubemap texture, you would write:

var texCubemap:CubeTexture = context3D.createCubeTexture(256, Context3DTextureFormat.COMPRESSED_ALPHA, false);
var textureAsset:ByteArray = new TextureAsset() as ByteArray;
texCubemap.uploadCompressedTextureFromByteArray(textureAsset, 0);

Also, depending on the format of the texture, “dxt1” or “dxt5” is needed in the texture sampler of your fragment shader:

  • Nothing needed for Context3DTextureFormat.BGRA , same as before
  • “dxt1” for Context3DTextureFormat.COMPRESSED (whatever the texture format used, DXT, PVRTC, or ETC1)
  • “dxt5” for Context3DTextureFormat.COMPRESSED_ALPHA  (whatever the texture format used, DXT, PVRTC, or ETC1)
You can also check the specific  Starling commit for ATF support  to see how it got integrated.

Integration with Starling

Great news, Starling already supports ATF textures through theTexture.uploadAtfData API. Find here all the details about ATF and Starling, but it is as simple as this:

[Embed(source="starling.atf", mimeType="application/octet-stream")]
public static const CompressedData:Class;

var data:ByteArray = new CompressedData();
var texture:Texture = Texture.fromAtfData(data);

var image:Image = new Image(texture);
addChild(image);

Yes, as simple as this .

Limitations

I want to highlight that even if ATF will be very useful for 2D content (like with Starling), ATF has been mainly designed for 3D textures purposes. So what does it mean?
The compression applied to the textures is lossy and may impact too much the quality of your assets. Things like RGBA8888 and RGBA4444 for PVR are not supported and could be an issue.
But we need your feedback and testing to see how we can improve ATF and add support for more compression types. So let us know!

Requirements

One thing to keep in mind is that to cover the entire set of capabilities for ATF textures, you need:

  • If you are using Starling, you need at least Starling 1.2. Just pull the latest version from Github .
  • If you are using Stage3D directly, you need to use the latestAGALMiniAssembler
  • You need at least the AIR SDK 3.4. Download Flash Builder 4.7 which comes out of the box with the AIR 3.4 SDK.
  • You need to target at least Flash Player 11.4/AIR 3.4
  • You need to add the following compiler argument: ”-swf-version=17”

Download

Download the ATF tools here . Which contains:

  • The ATF tools binaries (Linux, Mac, Windows).
  • ATF specification
  • ATF User Guide with some more details.

Enjoy!


link: http://www.tuicool.com/articles/Q3Ajay

command + N  查找类

command + shift + N 查找文件

alt + enter 快速import class

alt + command 格式化代码

shift + control + f 搜索全部文件

shift + command + u 大小写转换

command + alt + t
用*来围绕选中的代码行( * 包括if、while、try catch等)这个功能也很方便,把我以前要做的:①先写if-else,②然后调整代码的缩进格式,还要注意括号是否匹配了,现在用这个功能来做,省事多了(不过让我变得越来越懒了)

F2/Shift + F2
跳转到下/上一个错误语句处IDEA提供了一个在错误语句之间方便的跳转的功能,你使用这个快捷键可以快捷在出错的语句之间进行跳转。

command + Alt + O
优化import自动去除无用的import语句,蛮不错的一个功能。

command + ]/[
跳转到代码块结束/开始处,这个功能vi也有,也是很常用的一个代码编辑功能了。

command + E
可以显示最近编辑的文件列表

command + Shift +Backspace
可以跳转到上次编辑的地方

command + F12
可以显示当前文件的结构

command + F7
可以查询当前元素在当前文件中的引用,然后按F3可以选择

command+Alt+V
可以引入变量。例如把括号内的SQL赋成一个变量

command+Shift+F7
可以显示当前元素在文件中的使用

alt + F7
查找方法被调用的地方


link: http://blog.btnotes.com/articles/226.html

套接字模式

主动模式(选项{active, true})一般让人很喜欢,非阻塞消息接收,但在系统无法应对超大流量请求时,客户端发送的数据快过服务器可以处理的速度,那么系统就可能会造成消息缓冲区被塞满,可能出现持续繁忙的流量的极端情况下,系统因请求而溢出,虚拟机造成内存不足的风险而崩溃。

使用被动模式(选项{active, false})的套接字,底层的TCP缓冲区可用于抑制请求,并拒绝客户端的消息,在接收数据的地方都会调用gen_tcp:recv,造成阻塞(单进程模式下就只能消极等待某一个具体的客户端套接字,很危险)。需要注意的是,操作系统可能还会做一些缓存允许客户端机器继续发送少量数据,然后才会将其阻塞,此时Erlang尚未调用recv函数。

混合型模式(半阻塞),使用选项{active, once}打开,主动仅针对一个消息,在控制进程发送完一个数据消息后,必须显示调用inet:setopts(Socket, [{active, once}])重新激活以便接受下一个消息(在此之前,系统处于阻塞状态)。可见,混合型模式综合了主动模式和被动模式的两者优势,可实现流量控制,防止服务器被过多消息淹没。

以下TCP Server代码,都是建立在混合型模式(半阻塞)基础上。

prim_inet相关说明

prim_inet没有官方文档,可以认为是对底层socket的直接包装。淘宝yufeng说,这是otp内部实现的细节 是针对Erlang库开发者的private module,底层模块,不推荐使用。但在Building a Non-blocking TCP server using OTP principles示范中演示了prim_inet操作Socket异步特性。

设计模式

一般来说,需要一个单独进程进行客户端套接字监听,每一个子进程进行处理来自具体客户端的socket请求。

Building a Non-blocking TCP server using OTP principles示范中,子进程使用gen_fsm处理,很巧妙的结合状态机和消息事件,值得学习。

Erlang: A Generalized TCP Server文章中,作者也是使用此模式,但子进程不符合OTP规范,因此个人认为不是一个很好的实践模式。

simple_one_for_one

简易的一对一监督进程,用来创建一组动态子进程。对于需要并发处理多个请求的服务器较为合适。比如socket 服务端接受新的客户端连接请求以后,需要动态创建一个新的socket连接处理子进程。若遵守OTP原则,那就是子监督进程。

TCP Server实现

基于标准API简单实现

也是基于{active, once}模式,但阻塞的等待下一个客户端连接的任务被抛给了子监督进程。

看一下入口tcp_server_app吧

module(tcp_server_app).
author(‘yongboy@gmail.com’).
behaviour(application).
export([start/2, stop/1]).
define(DEF_PORT, 2222).
start(_Type, _Args) ->
Opts = [binary, {packet, 2}, {reuseaddr, true},
{keepalive, true}, {backlog, 30}, {active, false}],
ListenPort = get_app_env(listen_port, ?DEF_PORT),
{ok, LSock} = gen_tcp:listen(ListenPort, Opts),
case tcp_server_sup:start_link(LSock) of
{ok, Pid} ->
tcp_server_sup:start_child(),
{ok, Pid};
Other ->
{error, Other}
end.
stop(_S) ->
ok.
get_app_env(Opt, Default) ->
case application:get_env(application:get_application(), Opt) of
{ok, Val} -> Val;
_ ->
case init:get_argument(Opt) of
[[Val | _]] -> Val;
error -> Default
end
end.

读取端口,然后启动主监督进程(此时还不会监听处理客户端socket请求),紧接着启动子监督进程,开始处理来自客户端的socket的连接。

监督进程tcp_server_sup也很简单:

module(tcp_server_sup).
author(‘yongboy@gmail.com’).
behaviour(supervisor).
export([start_link/1, start_child/0]).
export([init/1]).
define(SERVER, ?MODULE).
start_link(LSock) ->
supervisor:start_link({local, ?SERVER}, ?MODULE, [LSock]).
start_child() ->
supervisor:start_child(?SERVER, []).
init([LSock]) ->
Server = {tcp_server_handler, {tcp_server_handler, start_link, [LSock]},
temporary, brutal_kill, worker, [tcp_server_handler]},
Children = [Server],
RestartStrategy = {simple_one_for_one, 0, 1},
{ok, {RestartStrategy, Children}}.

需要注意的是,只有调用start_child函数时,才真正调用tcp_server_handler:start_link([LSock])函数。

tcp_server_handler的代码也不复杂:

module(tcp_server_handler).
behaviour(gen_server).
export([start_link/1]).
export([init/1, handle_call/3, handle_cast/2, handle_info/2,
terminate/2, code_change/3]).
record(state, {lsock, socket, addr}).
start_link(LSock) ->
gen_server:start_link(?MODULE, [LSock], []).
init([Socket]) ->
inet:setopts(Socket, [{active, once}, {packet, 2}, binary]),
{ok, #state{lsock = Socket}, 0}.
handle_call(Msg, _From, State) ->
{reply, {ok, Msg}, State}.
handle_cast(stop, State) ->
{stop, normal, State}.
handle_info({tcp, Socket, Data}, State) ->
inet:setopts(Socket, [{active, once}]),
io:format(~p got message ~p\n, [self(), Data]),
ok = gen_tcp:send(Socket, <<Echo back : , Data/binary>>),
{noreply, State};
handle_info({tcp_closed, Socket}, #state{addr=Addr} = StateData) ->
error_logger:info_msg(~p Client ~p disconnected.\n, [self(), Addr]),
{stop, normal, StateData};
handle_info(timeout, #state{lsock = LSock} = State) ->
{ok, ClientSocket} = gen_tcp:accept(LSock),
{ok, {IP, _Port}} = inet:peername(ClientSocket),
tcp_server_sup:start_child(),
{noreply, State#state{socket=ClientSocket, addr=IP}};
handle_info(_Info, StateData) ->
{noreply, StateData}.
terminate(_Reason, #state{socket=Socket}) ->
(catch gen_tcp:close(Socket)),
ok.
code_change(_OldVsn, State, _Extra) ->
{ok, State}.

代码很精巧,有些小技巧在里面。子监督进程调用start_link函数,init会返回{ok, #state{lsock = Socket}, 0}. 数字0代表了timeout数值,意味着gen_server马上调用handle_info(timeout, #state{lsock = LSock} = State)函数,执行客户端socket监听,阻塞于此,但不会影响在此模式下其它函数的调用。直到有客户端进来,然后启动一个新的子监督进程tcp_server_handler,当前子监督进程解除阻塞。


基于prim_inet实现

这个实现师从于Non-blocking TCP server using OTP principles一文,但子进程改为了gen_server实现。

看一看入口,很简单的:

module(tcp_server_app).
author(‘yongboy@gmail.com’).
behaviour(application).
export([start_client/1]).
export([start/2, stop/1]).
define(DEF_PORT, 2222).
%% A startup function for spawning new client connection handling FSM.
%% To be called by the TCP listener process.
start_client(Socket) ->
tcp_server_sup:start_child(Socket).
start(_Type, _Args) ->
ListenPort = get_app_env(listen_port, ?DEF_PORT),
tcp_server_sup:start_link(ListenPort, tcp_client_handler).
stop(_S) ->
ok.
get_app_env(Opt, Default) ->
case application:get_env(application:get_application(), Opt) of
{ok, Val} -> Val;
_ ->
case init:get_argument(Opt) of
[[Val | _]] -> Val;
error -> Default
end
end.

监督进程代码:

module(tcp_server_sup).
author(‘yongboy@gmail.com’).
behaviour(supervisor).
export([start_child/1, start_link/2, init/1]).
define(SERVER, ?MODULE).
define(CLIENT_SUP, tcp_client_sup).
define(MAX_RESTART, 5).
define(MAX_TIME, 60).
start_child(Socket) ->
supervisor:start_child(?CLIENT_SUP, [Socket]).
start_link(ListenPort, HandleMoudle) ->
supervisor:start_link({local, ?SERVER}, ?MODULE, [ListenPort, HandleMoudle]).
init([Port, Module]) ->
TcpListener = {tcp_server_sup, % Id = internal id
{tcp_listener, start_link, [Port, Module]}, % StartFun = {M, F, A}
permanent, % Restart = permanent | transient | temporary
2000, % Shutdown = brutal_kill | int() >= 0 | infinity
worker, % Type = worker | supervisor
[tcp_listener] % Modules = [Module] | dynamic
},
TcpClientSupervisor = {?CLIENT_SUP,
{supervisor, start_link, [{local, ?CLIENT_SUP}, ?MODULE, [Module]]},
permanent,
infinity,
supervisor,
[]
},
{ok,
{{one_for_one, ?MAX_RESTART, ?MAX_TIME},
[TcpListener, TcpClientSupervisor]
}
};
init([Module]) ->
{ok,
{_SupFlags = {simple_one_for_one, ?MAX_RESTART, ?MAX_TIME},
[
% TCP Client
{ undefined, % Id = internal id
{Module, start_link, []}, % StartFun = {M, F, A}
temporary, % Restart = permanent | transient | temporary
2000, % Shutdown = brutal_kill | int() >= 0 | infinity
worker, % Type = worker | supervisor
[] % Modules = [Module] | dynamic
}
]
}
}.

策略不一样,one_for_one包括了一个监听进程tcp_listener,还包含了一个tcp_client_sup进程树(simple_one_for_one策略)

tcp_listener单独一个进程用于监听来自客户端socket的连接:

module(tcp_listener).
author(‘saleyn@gmail.com’).
behaviour(gen_server).
export([start_link/2]).
export([init/1, handle_call/3, handle_cast/2, handle_info/2, terminate/2,
code_change/3]).
record(state, {
listener, % Listening socket
acceptor, % Asynchronous acceptor’s internal reference
module % FSM handling module
}).
start_link(Port, Module) when is_integer(Port), is_atom(Module) ->
gen_server:start_link({local, ?MODULE}, ?MODULE, [Port, Module], []).
init([Port, Module]) ->
process_flag(trap_exit, true),
Opts = [binary, {packet, 2}, {reuseaddr, true},
{keepalive, true}, {backlog, 30}, {active, false}],
case gen_tcp:listen(Port, Opts) of
{ok, Listen_socket} ->
%%Create first accepting process
{ok, Ref} = prim_inet:async_accept(Listen_socket, 1),
{ok, #state{listener = Listen_socket,
acceptor = Ref,
module = Module}};
{error, Reason} ->
{stop, Reason}
end.
handle_call(Request, _From, State) ->
{stop, {unknown_call, Request}, State}.
handle_cast(_Msg, State) ->
{noreply, State}.
handle_info({inet_async, ListSock, Ref, {ok, CliSocket}},
#state{listener=ListSock, acceptor=Ref, module=Module} = State) ->
try
case set_sockopt(ListSock, CliSocket) of
ok -> ok;
{error, Reason} -> exit({set_sockopt, Reason})
end,
%% New client connected – spawn a new process using the simple_one_for_one
%% supervisor.
{ok, Pid} = tcp_server_app:start_client(CliSocket),
gen_tcp:controlling_process(CliSocket, Pid),
%% Signal the network driver that we are ready to accept another connection
case prim_inet:async_accept(ListSock, 1) of
{ok, NewRef} -> ok;
{error, NewRef} -> exit({async_accept, inet:format_error(NewRef)})
end,
{noreply, State#state{acceptor=NewRef}}
catch exit:Why ->
error_logger:error_msg(Error in async accept: ~p.\n, [Why]),
{stop, Why, State}
end;
handle_info({inet_async, ListSock, Ref, Error}, #state{listener=ListSock, acceptor=Ref} = State) ->
error_logger:error_msg(Error in socket acceptor: ~p.\n, [Error]),
{stop, Error, State};
handle_info(_Info, State) ->
{noreply, State}.
terminate(_Reason, State) ->
gen_tcp:close(State#state.listener),
ok.
code_change(_OldVsn, State, _Extra) ->
{ok, State}.
%% Taken from prim_inet. We are merely copying some socket options from the
%% listening socket to the new client socket.
set_sockopt(ListSock, CliSocket) ->
true = inet_db:register_socket(CliSocket, inet_tcp),
case prim_inet:getopts(ListSock, [active, nodelay, keepalive, delay_send, priority, tos]) of
{ok, Opts} ->
case prim_inet:setopts(CliSocket, Opts) of
ok -> ok;
Error -> gen_tcp:close(CliSocket), Error
end;
Error ->
gen_tcp:close(CliSocket), Error
end.
view rawtcp_listener.erl hosted with ❤ by GitHub

很显然,接收客户端的连接之后,转交给tcp_client_handler模块进行处理:

module(tcp_client_handler).
behaviour(gen_server).
export([start_link/1]).
export([init/1, handle_call/3, handle_cast/2, handle_info/2, terminate/2, code_change/3]).
record(state, {socket, addr}).
define(TIMEOUT, 120000).
start_link(Socket) ->
gen_server:start_link(?MODULE, [Socket], []).
init([Socket]) ->
inet:setopts(Socket, [{active, once}, {packet, 2}, binary]),
{ok, {IP, _Port}} = inet:peername(Socket),
{ok, #state{socket=Socket, addr=IP}}.
handle_call(Request, From, State) ->
{noreply, ok, State}.
handle_cast(Msg, State) ->
{noreply, State}.
handle_info({tcp, Socket, Data}, State) ->
inet:setopts(Socket, [{active, once}]),
io:format(~p got message ~p\n, [self(), Data]),
ok = gen_tcp:send(Socket, <<Echo back : , Data/binary>>),
{noreply, State};
handle_info({tcp_closed, Socket}, #state{addr=Addr} = StateData) ->
error_logger:info_msg(~p Client ~p disconnected.\n, [self(), Addr]),
{stop, normal, StateData};
handle_info(_Info, StateData) ->
{noreply, StateData}.
terminate(_Reason, #state{socket=Socket}) ->
(catch gen_tcp:close(Socket)),
ok.
code_change(OldVsn, State, Extra) ->
{ok, State}.

和标准API对比一下,可以感受到异步IO的好处。

小结

通过不同的模式,简单实现一个基于Erlang OTP的TCP服务器,也是学习总结,不至于忘记。

您若有更好的建议,欢迎告知,谢谢。

link: http://www.blogjava.net/yongboy/archive/2012/10/24/390185.html

为了研究怎么用Erlang写一个游戏服务器,我很幸运的下到了一份英雄远征的服
务器Erlang源码,这两天花了点时间看代码,其中看到做TCP的accept动作时,它
是用的一个函数prim_inet:async_accept/2,这个可跟书上说的不一样(一般来
说书上教的是用gen_tcp:accept/1),于是我google了一下,发现找不到文档,
再翻一下发现已经有不少人问为什么这是一个undocumented的函数,也就是说
Erlang就没想让你去用这个函数,所以文档自然没提供。一般来说undocumented
的函数你是最好别用,因为下一次Erlang更新的时候没准就没这个函数了,或者
参数变了,或者行为变了。总之各种不靠谱的事都可以发生。这个事情可以由
这个帖子 看到。不过,这个帖子还特地说了:However, you might find
prim_inet:async_accept/2 useful.这样又把我们带到了 这个帖子 。在这里,
楼主说看起来这个函数很有趣,很有用,对此提了2个问题,1是为什么这个函数
还是一个undocumented,2是用这个函数安全吗?楼主还给了一篇讲如何用OTP原
理打造一个非阻塞的TCP服务器的文章。

这篇文章中说,虽然prim_inet:async_accept/2是一个undocumented的函数,但
因为他要写一个非阻塞的accept,所以还是会冒险去挖掘它的潜能。因为普通的
函数gen_tcp:accept/1是阻塞的,而现在需要做一个非阻塞的accept,只好用这
个undocumented的函数。

考虑一下这种异步的accept实现可以比同步的accept快多少?当同时有100个并发
的连接请求时,如果同样是有10个进程在做accept,异步的情况能让这100个请求
同时开始被处理。而同步的实现则需要让90个请求等待,先和10个请求accept完
再处理。最撮的那10个请求将要等待9次。(注:这只是简化的思考,实际上有可
能某个请求要等上几十次)再考虑每次的accept,这个我不太清楚,但我想应该
就是建立TCP连接的过程,也就是说client和server之间来回要跑3个包。假设平
均的延时是40ms,那么来回3次是120ms,等待10次差不多是要1秒多。考虑更差的
情况下,可能要等上几十秒,这种就已经是不能忍受的了。从这个角度来说,异
步的accept还是有价值的。

但是,同时有大量并发的连接请求的情况并不会经常出现。以游戏为例,只在刚
开服的时候会遇到这样的问题。正常运行的服务器很少再遇到大量的并发连接请
求。我想说的是,如果我们用100个,甚至1000个阻塞性的accept进程来代替这种
非正式的异步实现,也未尝不可。毕竟1000个进程对于erlang来说还是小case,
而对一个游戏服务器已经够用了。

最后总结一下,一,prim_inet:async_accept/2实现的异步OTP的TCP server在处
理大量并发的情况有优势;二,这种情况可以通过多开一些同步的阻塞性accept
进程在一定程度上克服;三,调用这个函数理论上来说毕竟还是不能完全放心的,
用不用看你的选择了。

最后,如果有时间,可以考虑做一些测试,对这2种情况实际对比。